

Composition
Whether photography is just a hobby, taking pictures with your cell phone or you’re a professional with a high-tech camera, the most important concept for all photographers is how to effectively compose a nature/landscape image. You are probably familiar with the “rule of thirds,” as well as using “S shapes” and “lateral lines” to guide a viewer’s eyes through an image, while simultaneously creating a dramatic visual experience.…
Whether photography is just a hobby, taking pictures with your cell phone or you’re a professional with a high-tech camera, the most important concept for all photographers is how to effectively compose a nature/landscape image. You are probably familiar with the “rule of thirds,” as well as using “S shapes” and “lateral lines” to guide a viewer’s eyes through an image, while simultaneously creating a dramatic visual experience. In this blog, I’m going to focus on the rule of thirds and lateral lines, using specific examples. In a subsequent blog, I will discuss how to make more dramatic photos using light and color that make images “pop” by separating points of interest from the rest of the scene.
To begin, put aside lighting, technique, timing and execution and just visualize how you would compose a photo and how you would imagine, let’s say, your friends looking at it. What should be going through your mind, before hitting the shutter button, is how to compose your “soon to be” masterpiece. Once you feel you have everything in the right position by following the rule of thirds, then you may want to use your cell phone first to snap a shot of your composition. A close look at the cell phone photo will verify, if what you see through the viewfinder or camera display is actually what your mind is visualizing in your composition of the scene. If what you see on your cell phone is not what you had in mind, step back and take a look at the landscape in general and draw connections between the different parts of the scene to form a new image in your mind. Do not over think, keep it simple and keep the edges of your image clean. Once you feel comfortable with this process, you will find that you no longer need your cell phone to help you visualize.
So, what do we mean when we say “Keep it simple”? The rule of thirds offers general guidelines. As you can guess by its name, the rule states that you should divide your image into horizontal and vertical thirds (see photo of Thomas Murphy/Reed Moulton Barn below). If you are looking for guidance, your camera should have the capability of displaying this on your viewfinder. For me it’s easier to imagine breaking the image up into thirds. The theory behind this rule is that if you place the main objects in your composition along the intersections created by the rule of thirds, then your overall image will be more balanced and pleasing to the viewer.

What the rule of thirds does is to provide the viewer with a relationship between parts of the scene and thus creating a better understanding of what the photographer composed in his/her mind right before pressing the shutter button. People look at images in different ways, depending upon what catches their eye, left to right, top to bottom, etc. So which third of the image you place your main subjects of the photo is important to ensure that they are pleasing to the eye. I need to say here that, at times, “rules are made to be broken” and this holds true for the rule of thirds. Sometimes you can create something very dramatic by breaking the rule as you will see in some of my examples below. Most photographers have a natural tendency to place the main subject of the composition in the center third of the image, but sometimes magic can occur when you use off-center composition.
What you really need to be tuned into are what parts of the scene do you feel are most important to you and the viewer. After that, imagine those parts on different intersecting lines or sections of the rule of thirds to determine what is the best composition for that scene. You will see, in at least one of my examples, that the sky was the most important aspect of the image, so I gave it prominence on the top horizontal third extending over to the middle of the scene.
To reiterate, as you compose your image, always keep in mind “keep it simple.” Decide what you want the image to be and then think…maybe that means including less ocean, or removing the extra bristlecone tree, or omitting the entire archway, or maybe even the entire reflection. Many times, when you exclude certain parts of a composition, the image becomes more powerful.
Let’s look at some examples and imagine the rule of thirds grid placed over each photo. What you will see is that I did not always center the main subject in the photo. For several, I let the available light be the guide to where the viewer’s eye would follow my composition. You will also see where lateral lines focus the attention of the viewer to a given destination. In a night composition, I composed the scene knowing where the viewer’s eye would travel and gave prominence to the upper two thirds of the photo. In one photo, I was lying on my back, composing the image of Grosvenor’s Arch, knowing that I wanted the tree to be a prominent part of the image, pointing toward the double arch on top.

In my first example, Grosvenor’s Arch in Utah, the arrows point in the direction the eye would take in the image based on the rule of thirds from the lower horizontal third, through the middle, to the top horizontal third:

In the second example in Wyoming, the main aspect of the composition is the tree, which I placed off-center to highlight its importance as it towers over the mountains in the background, giving the mountain range a life of its own, free from the tree. The viewer’s eyes go from the brightly-colored sage grass on the bottom to the tree with the same coloring and then to the Tetons and the surrounding sky:
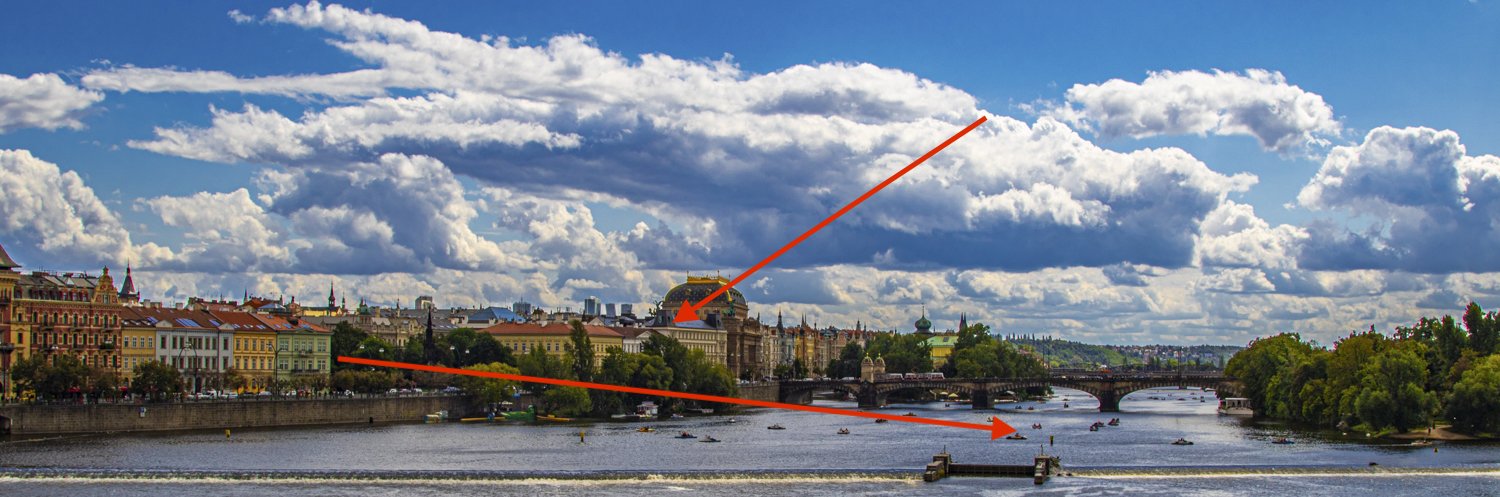
In this example, the sky dominates the composition covering the top and middle horizontal sections of the photo and takes the viewer’s eye from the sky to the shoreline, to the architectural colors, and finally to the Vltava River in Prague.

In the photo of the boardwalk in Asbury Park, New Jersey, center-leading lines draw the viewer’s attention from the woman to her final destination. To draw attention to the woman, I placed her on the bottom left intersection of the grid. The boardwalk dominates the theme leading to the Convention Center. The mist-filled sky fills the upper horizontal third of the photo:

In this example at Schwabacher Landing, Jackson Hole, Wyoming, the early morning, brightly lit mountains are located in the lower center horizontal third, drawing the viewer’s eyes toward the stars in the upper center and all of the top horizontal third. Finally, the viewer’s eyes fall to the reflection in the bottom horizontal third of the photo.

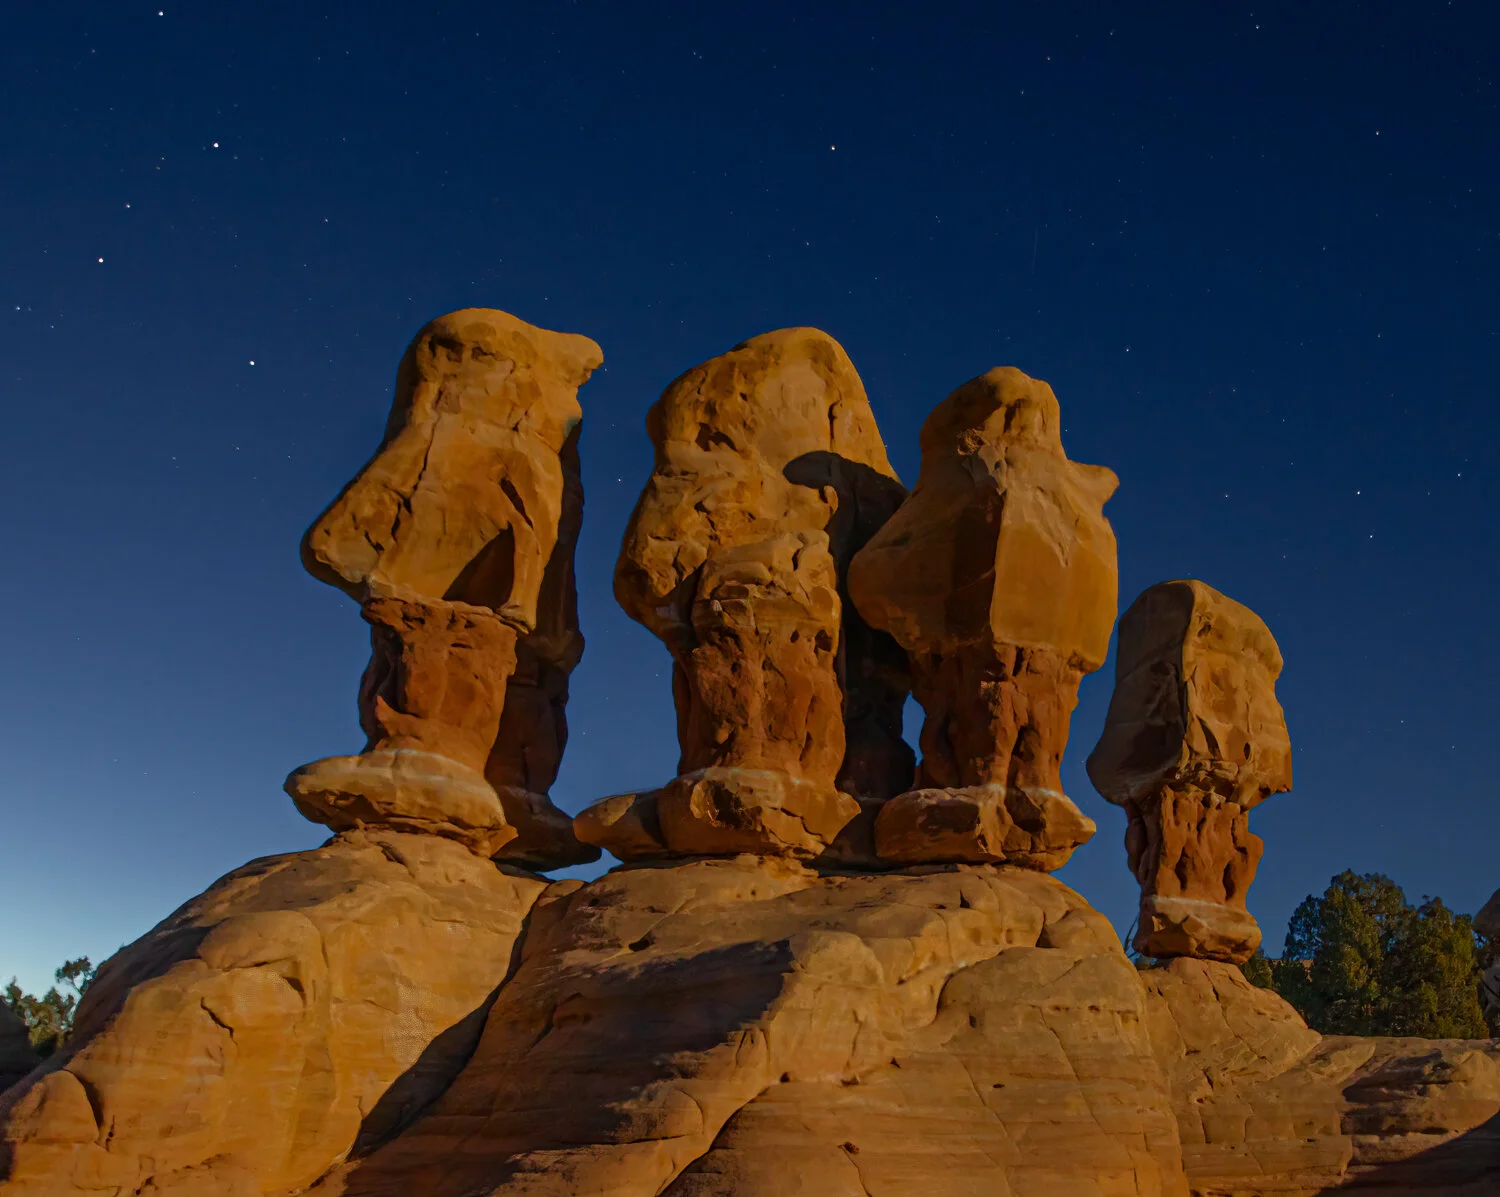
This photo is Devil’s Garden, Escalante, Utah, and a prime example of when it does not make sense to adhere to the rule of thirds in the location you are in at the moment. In this example, the arrows follow the light of sight, first reflecting off the rocks at the midpoint of the right intersection and then out to the sky:

This photo, from Newport Coast, California, shows how the main subject is off centered, the setting sun placed along the left intersecting line of the rule of thirds, and the flow of viewing, as identified by the arrows, from the sun to the partially lit flowers along the lower horizontal third to the dominating sky:

The next photo from Joshua Tree Park, California, is an interesting one for a couple of reasons. First, the branches in the water act as an anchor for the bottom portion of the photo, drawing the viewer first into this lower third section of the photo, then to the brightly colored vegetation along the right bank of the center third of the photo and finally to the distant mountain range in the upper horizontal third section of the photo. If I was shooting this image without an anchor and only to show symmetry in an image through the reflection of the mountain range and sky in the water, it would not make sense to use the rule of thirds, since every aspect of the photo would be centrally located in the image.

In this image from the Canyonlands, near Moab Utah, the rule of thirds is easily discernable with the main body of the winding road in the bottom third of the photo leading the viewer’s eye up to the center third of the photo, with the canyon walls and the road disappearing into the distance. Finally, the upper third portion of the photo is filled with the brilliant sky:

This photo from Mormon Row in Wyoming, is an example of not using the rule of thirds. Within this composition, there is a dominant theme in the foreground, the outhouse, placed left of center and the Teton mountain range in the background. So, if you are shooting with a shallow depth of field to separate your subject from the background, you may just want to be creative, and not closely follow the rule of thirds:
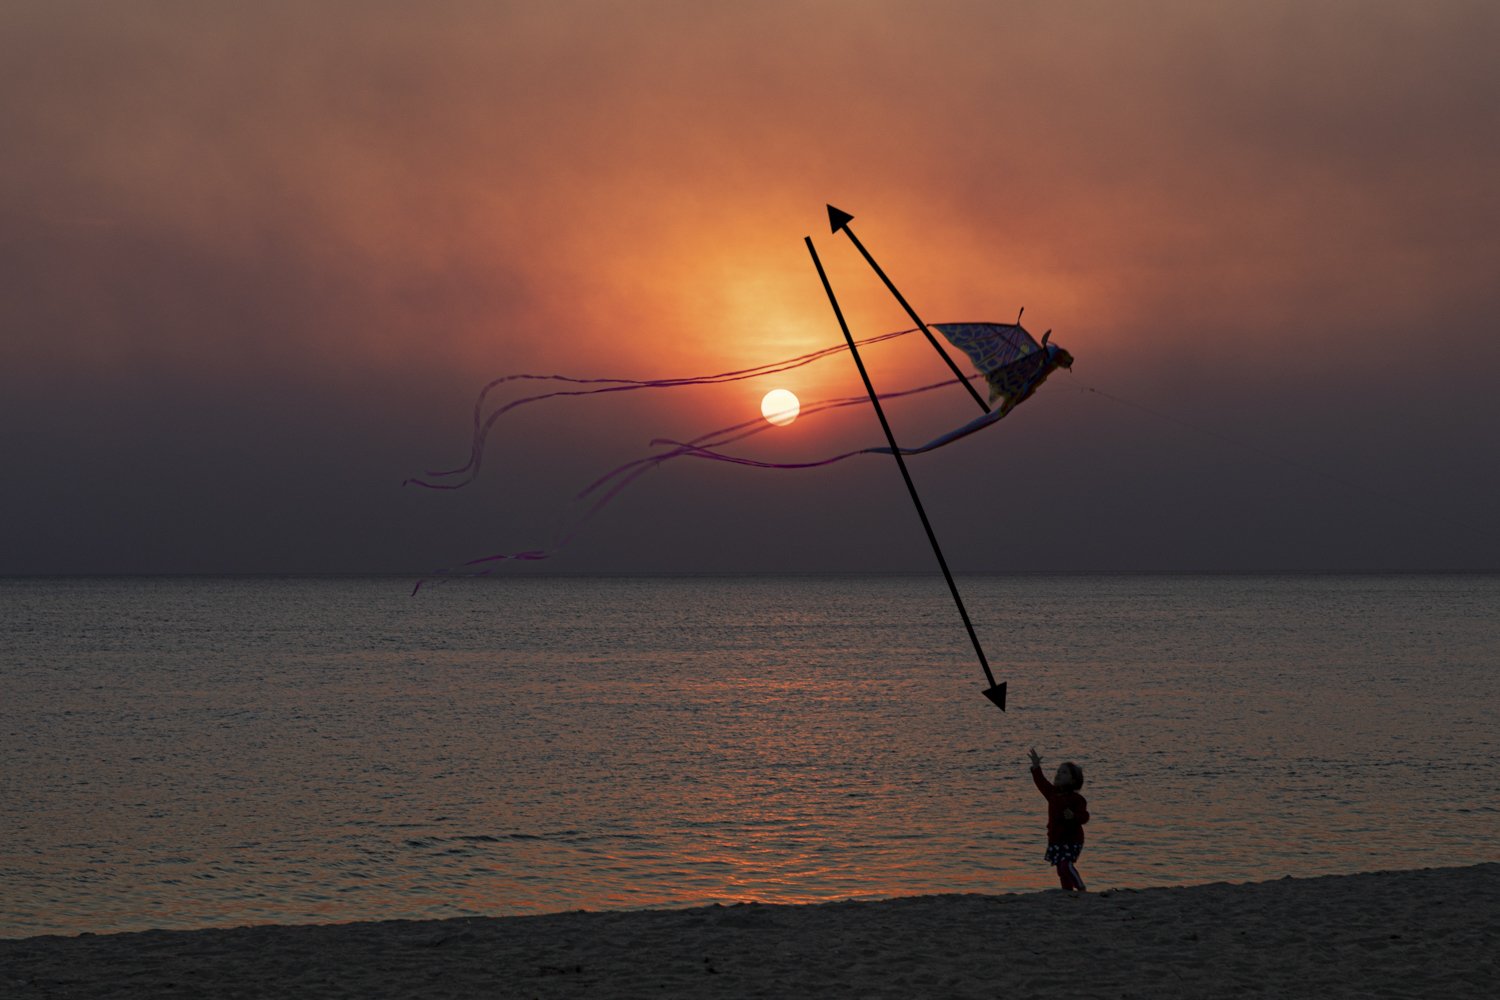
This example was a photo taken at Laguna Beach in California. The composition takes place in the center vertical section of the photo with the setting sun and smoke-filled sky filling the center portions of the middle and top horizontal thirds of the photo. The dragon kite is placed at the top right intersection and the child is placed at the bottom right intersection of the image at the edge of the ocean. All aspects of the photo complement each other. The viewer first sees the setting sun and the dragon kite, then the sky and finally the lone child:

In this example from outside of Jackson Hole, Wyoming, one can easily see the dominant themes filling the vertical thirds of the photo. The river fills the middle vertical third and the brightly colored trees of the riverbank filling the left and right vertical thirds. The arrows follow the viewer’s eye from the lower center section of the horizontal third up the river and then moving out to the brightly colored trees throughout the image:

In the final example from Venice, Italy, I show lateral lines which guide the viewer’s eyes from the reflection and the beautifully colored buildings to the brilliant sky in the upper right portion of the photo.
In summary, the rule of thirds is not a perfect science when applied in real-life situations. Rather, it’s a guideline that should help your composition, but not supersede your creativity when out in the field. If your compositional points of interest do not line up with the gridlines of the rule of thirds, that is perfectly fine. You alone are the maestro of your composition.

Posing for a Portrait
What to do and what not to do when posing for a Portrait. These Do’s and Don’ts are not in any select order, but they all are important and, of course, all come with examples. Sometimes, there are exceptions to a recommendation and if so, I will point those out during this blog. Much of the success of a photoshoot depends on the skill of posing.…
What to do and what not to do when posing for a Portrait. These Do’s and Don’ts are not in any select order, but they all are important and, of course, all come with examples. Sometimes, there are exceptions to a recommendation and if so, I will point those out during this blog. Much of the success of a photoshoot depends on the skill of posing and presenting oneself in the right way. Keep all these posing recommendations in mind and your photoshoot will be perfect.
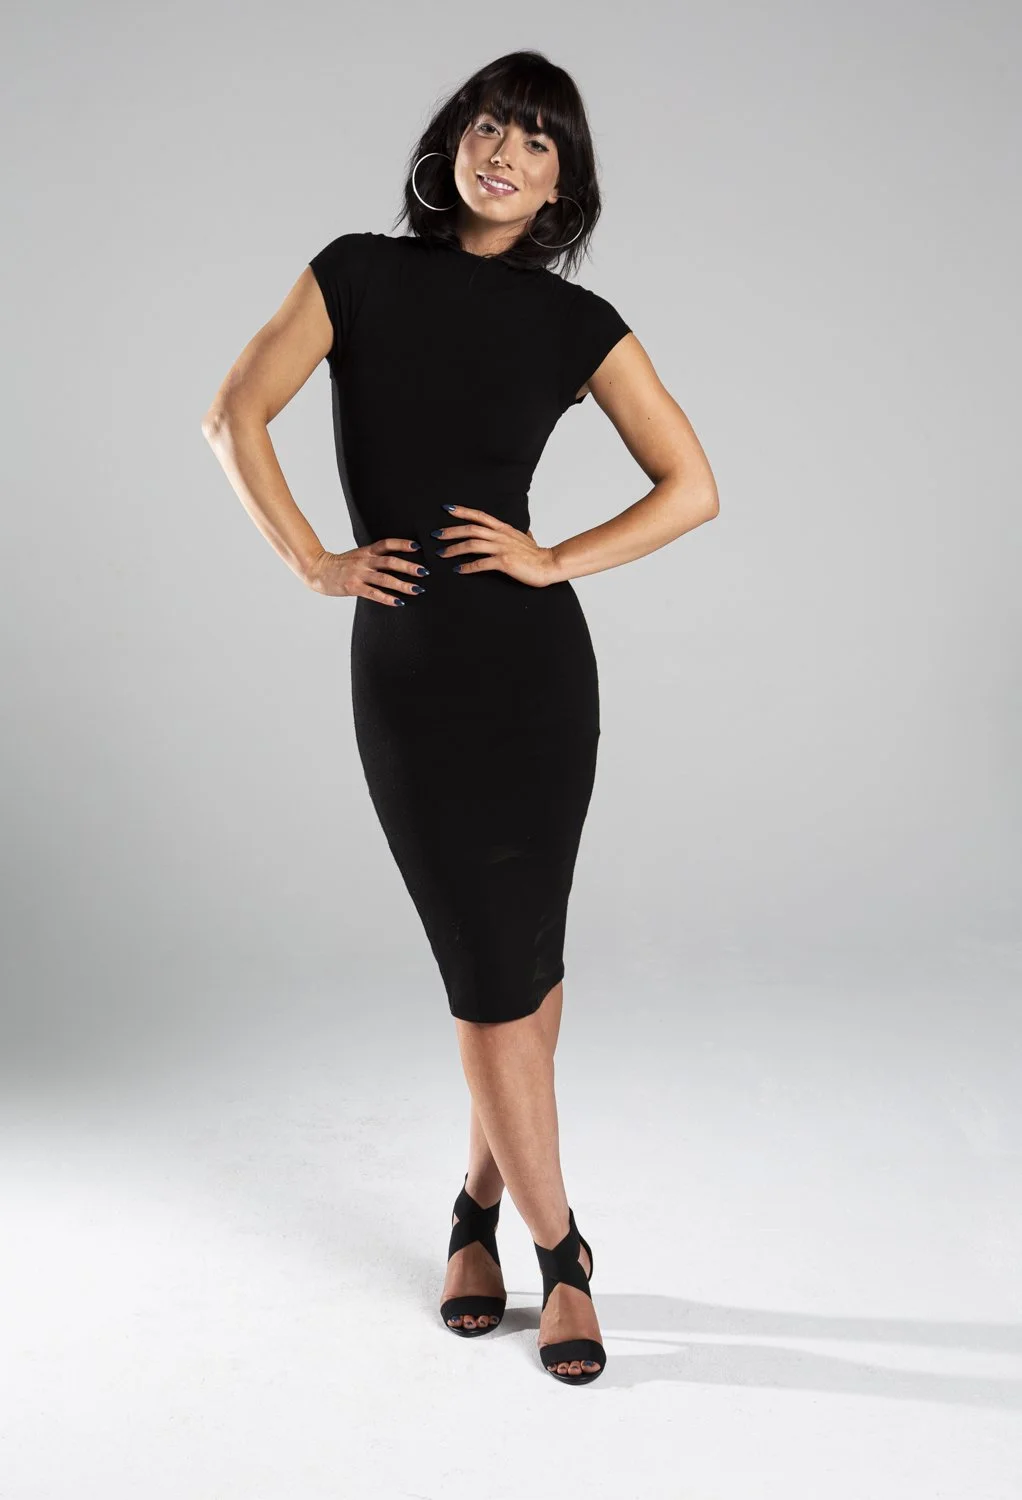
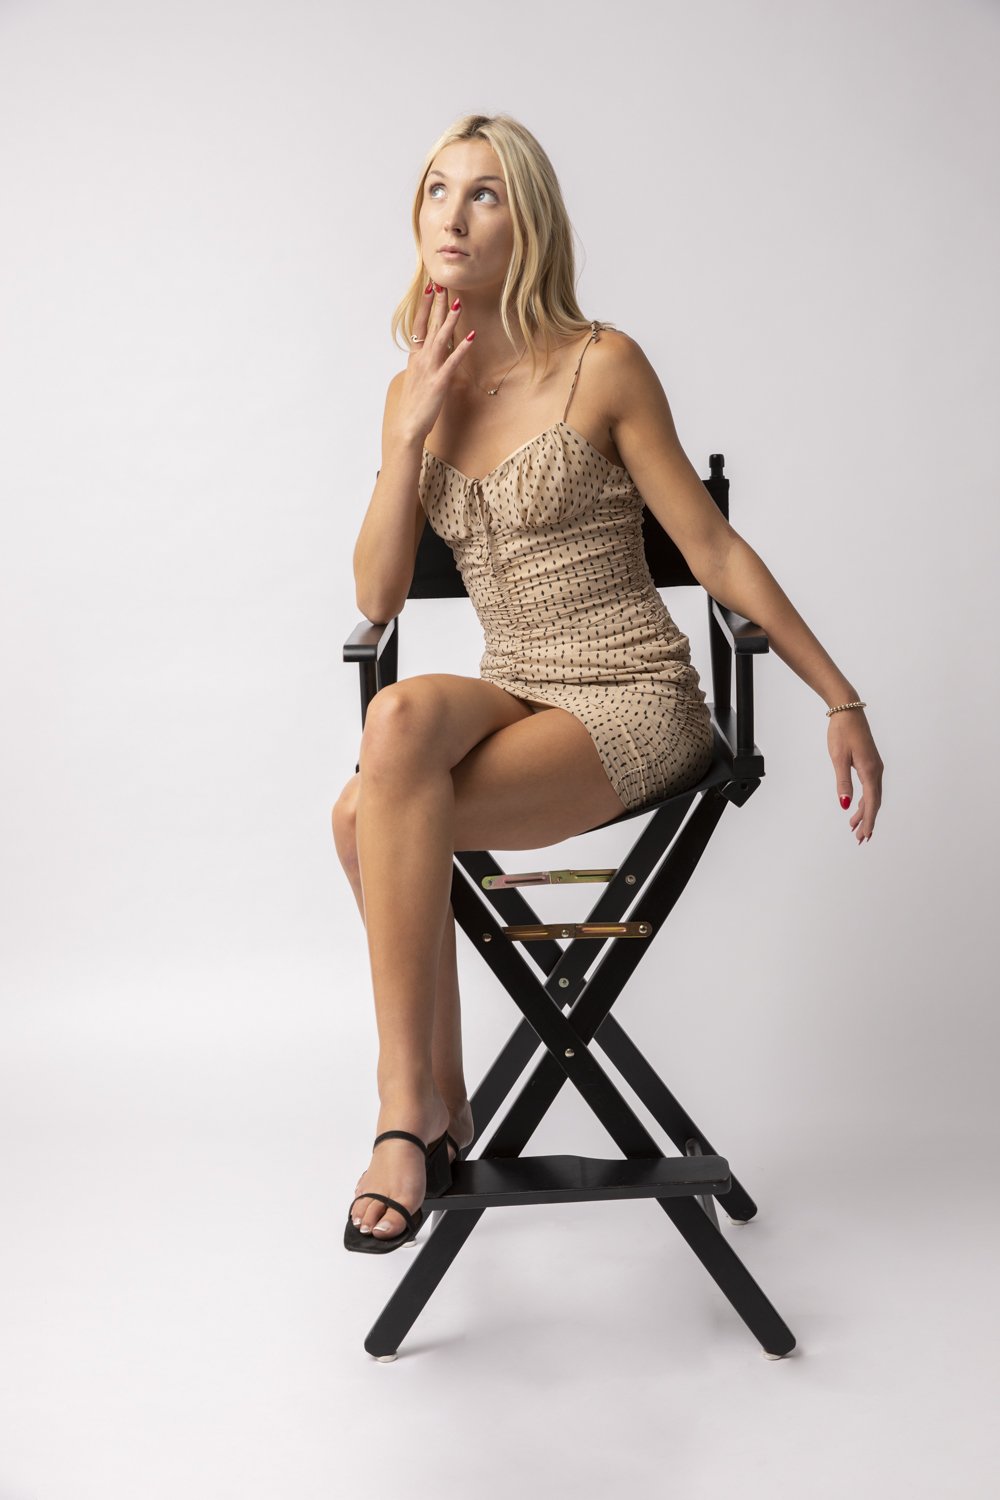
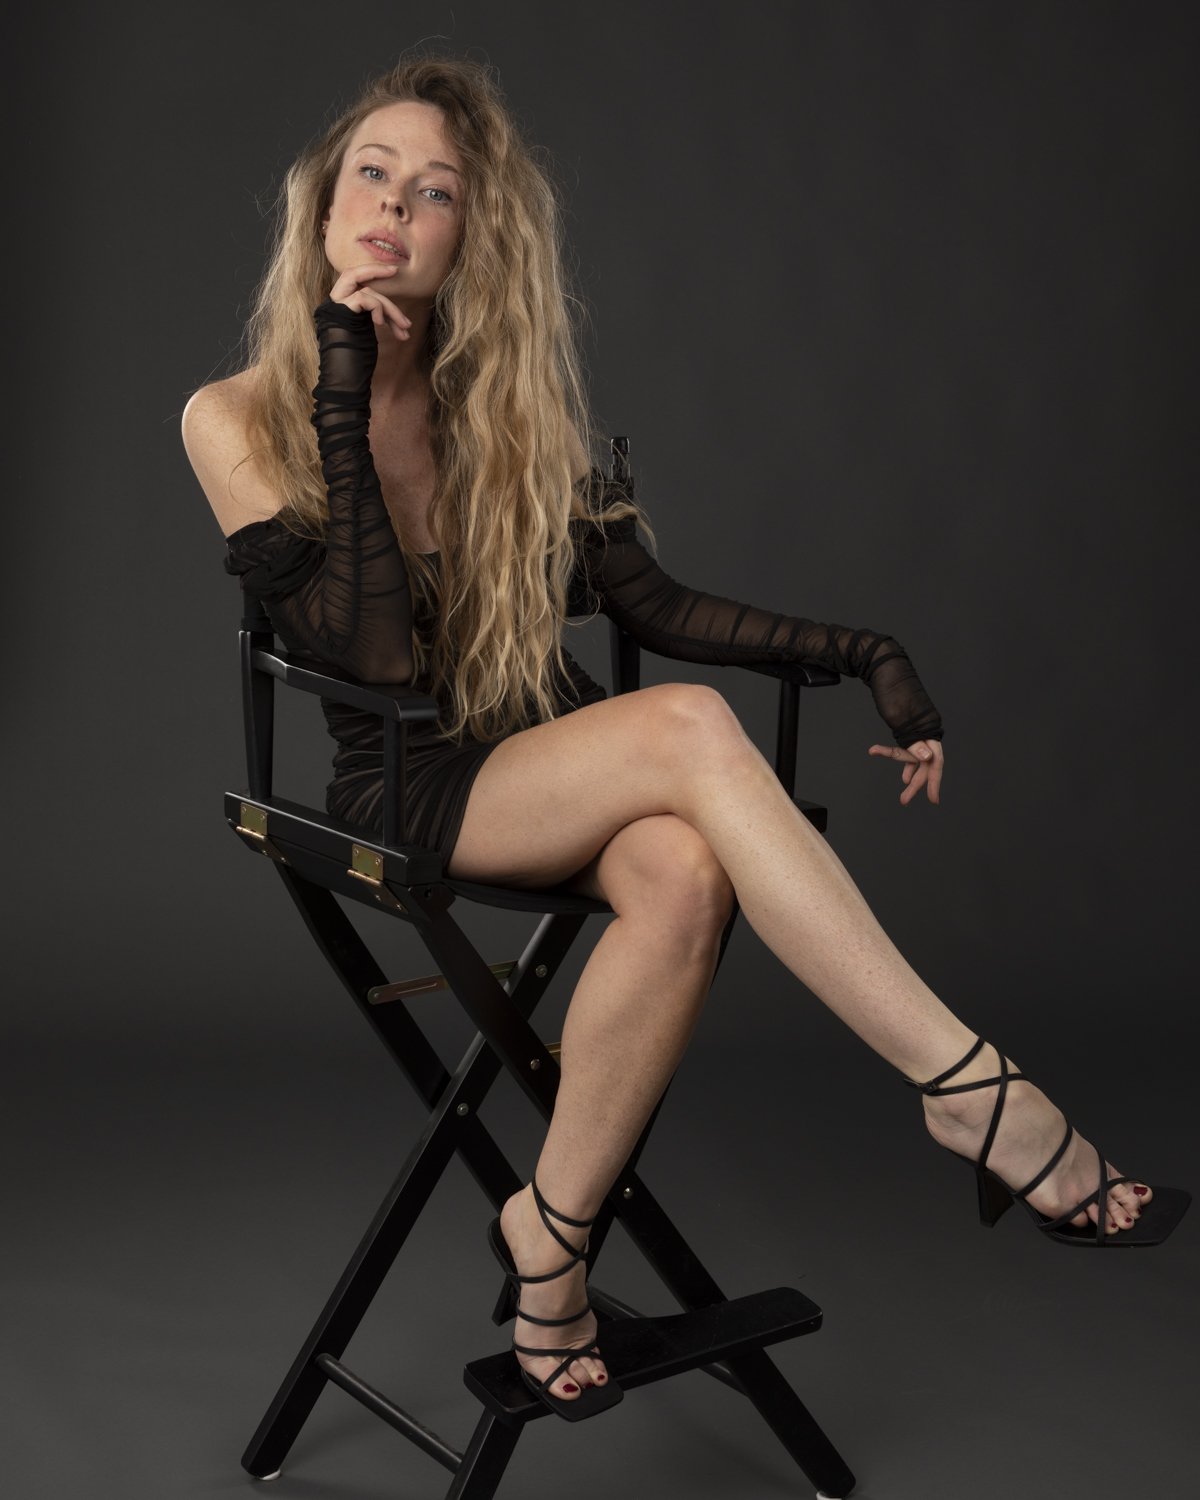
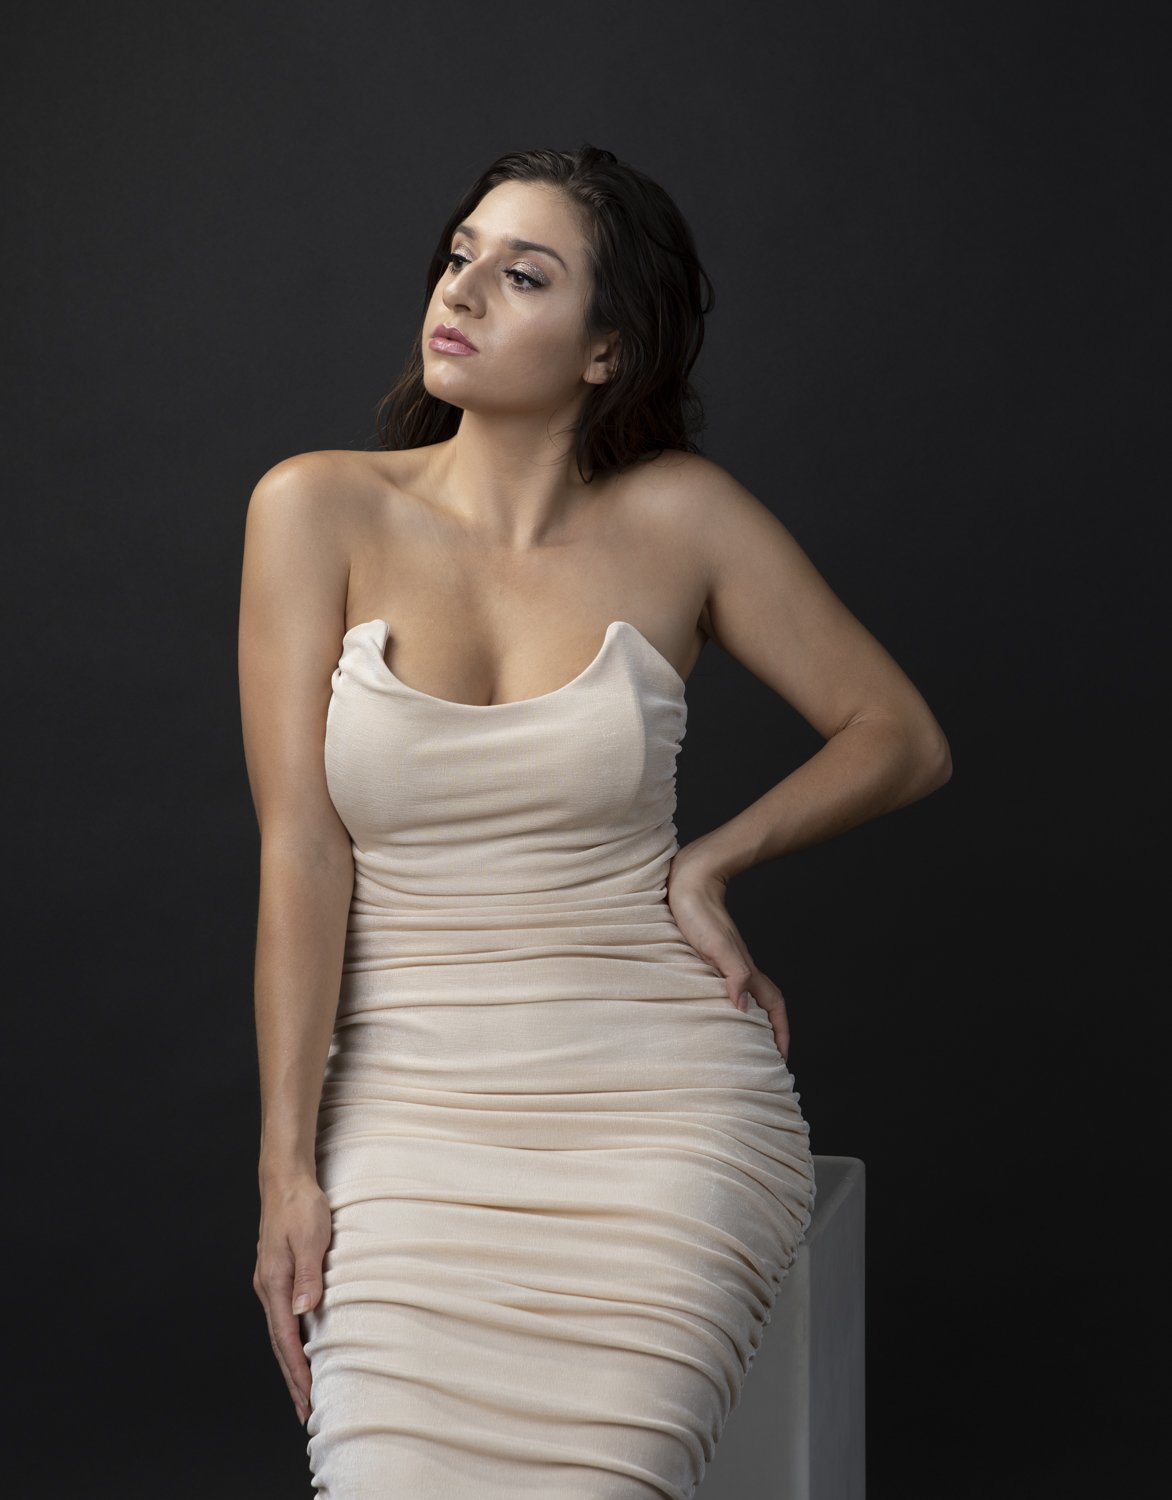
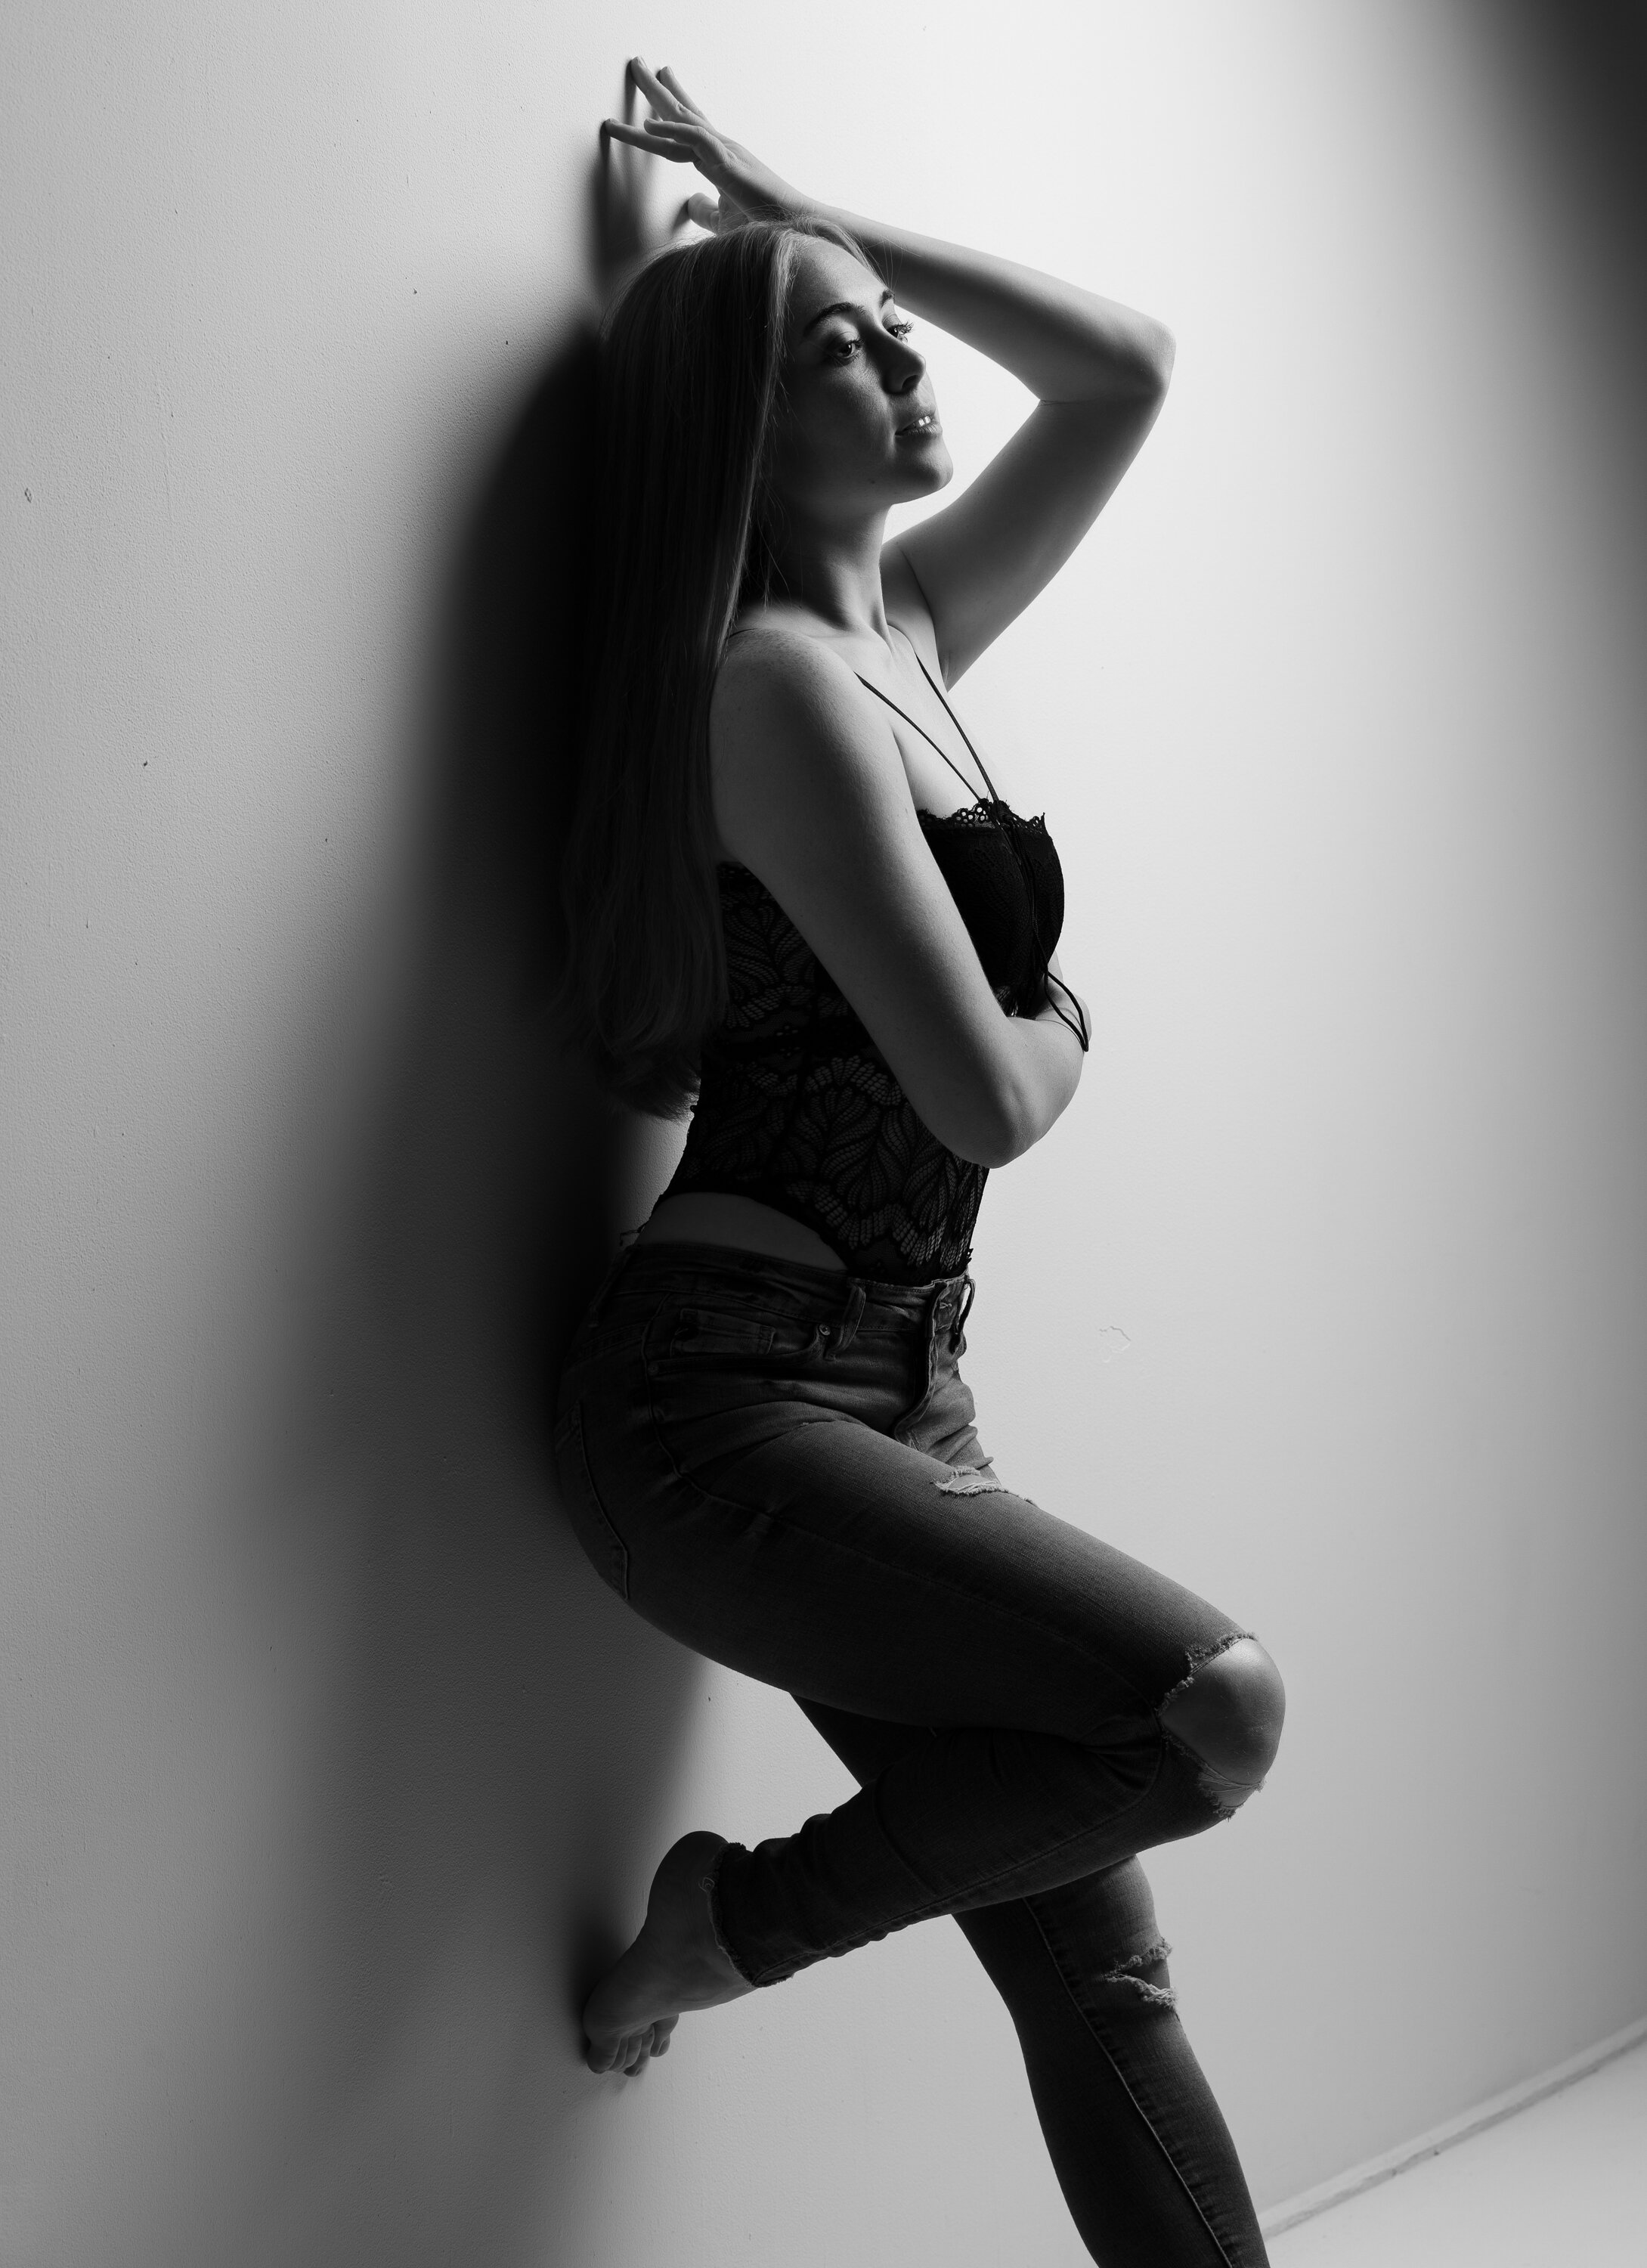
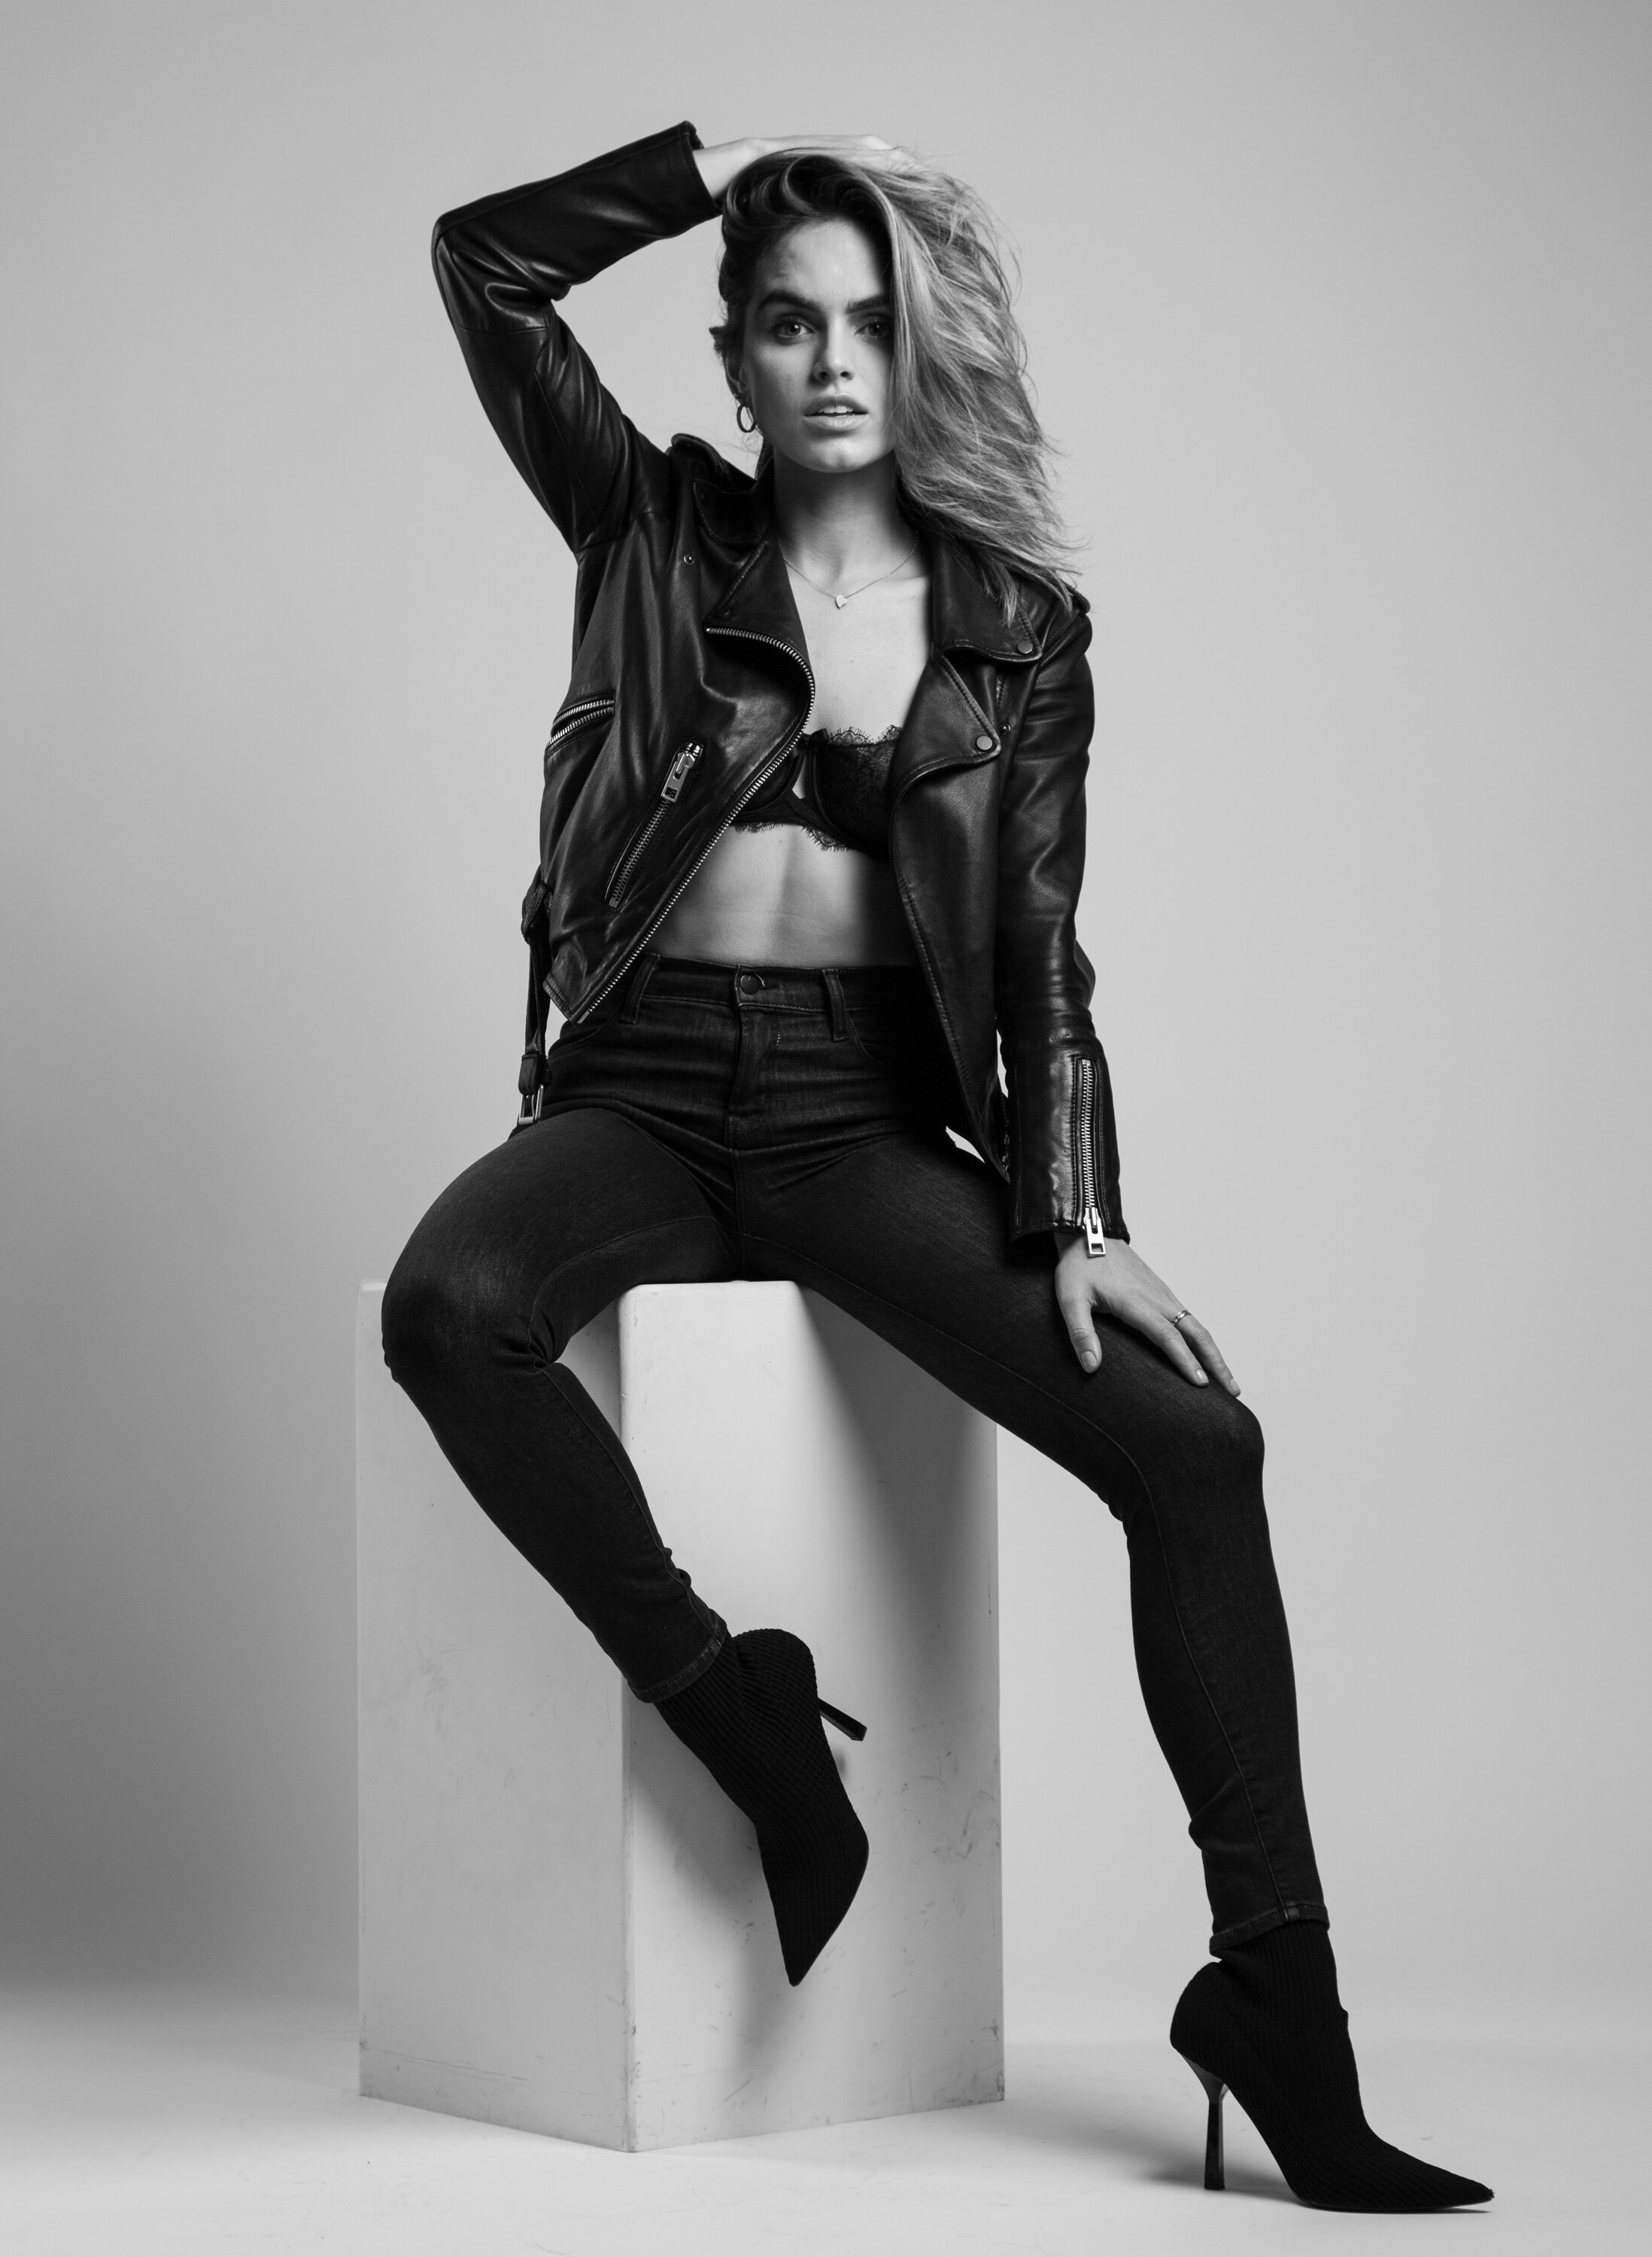
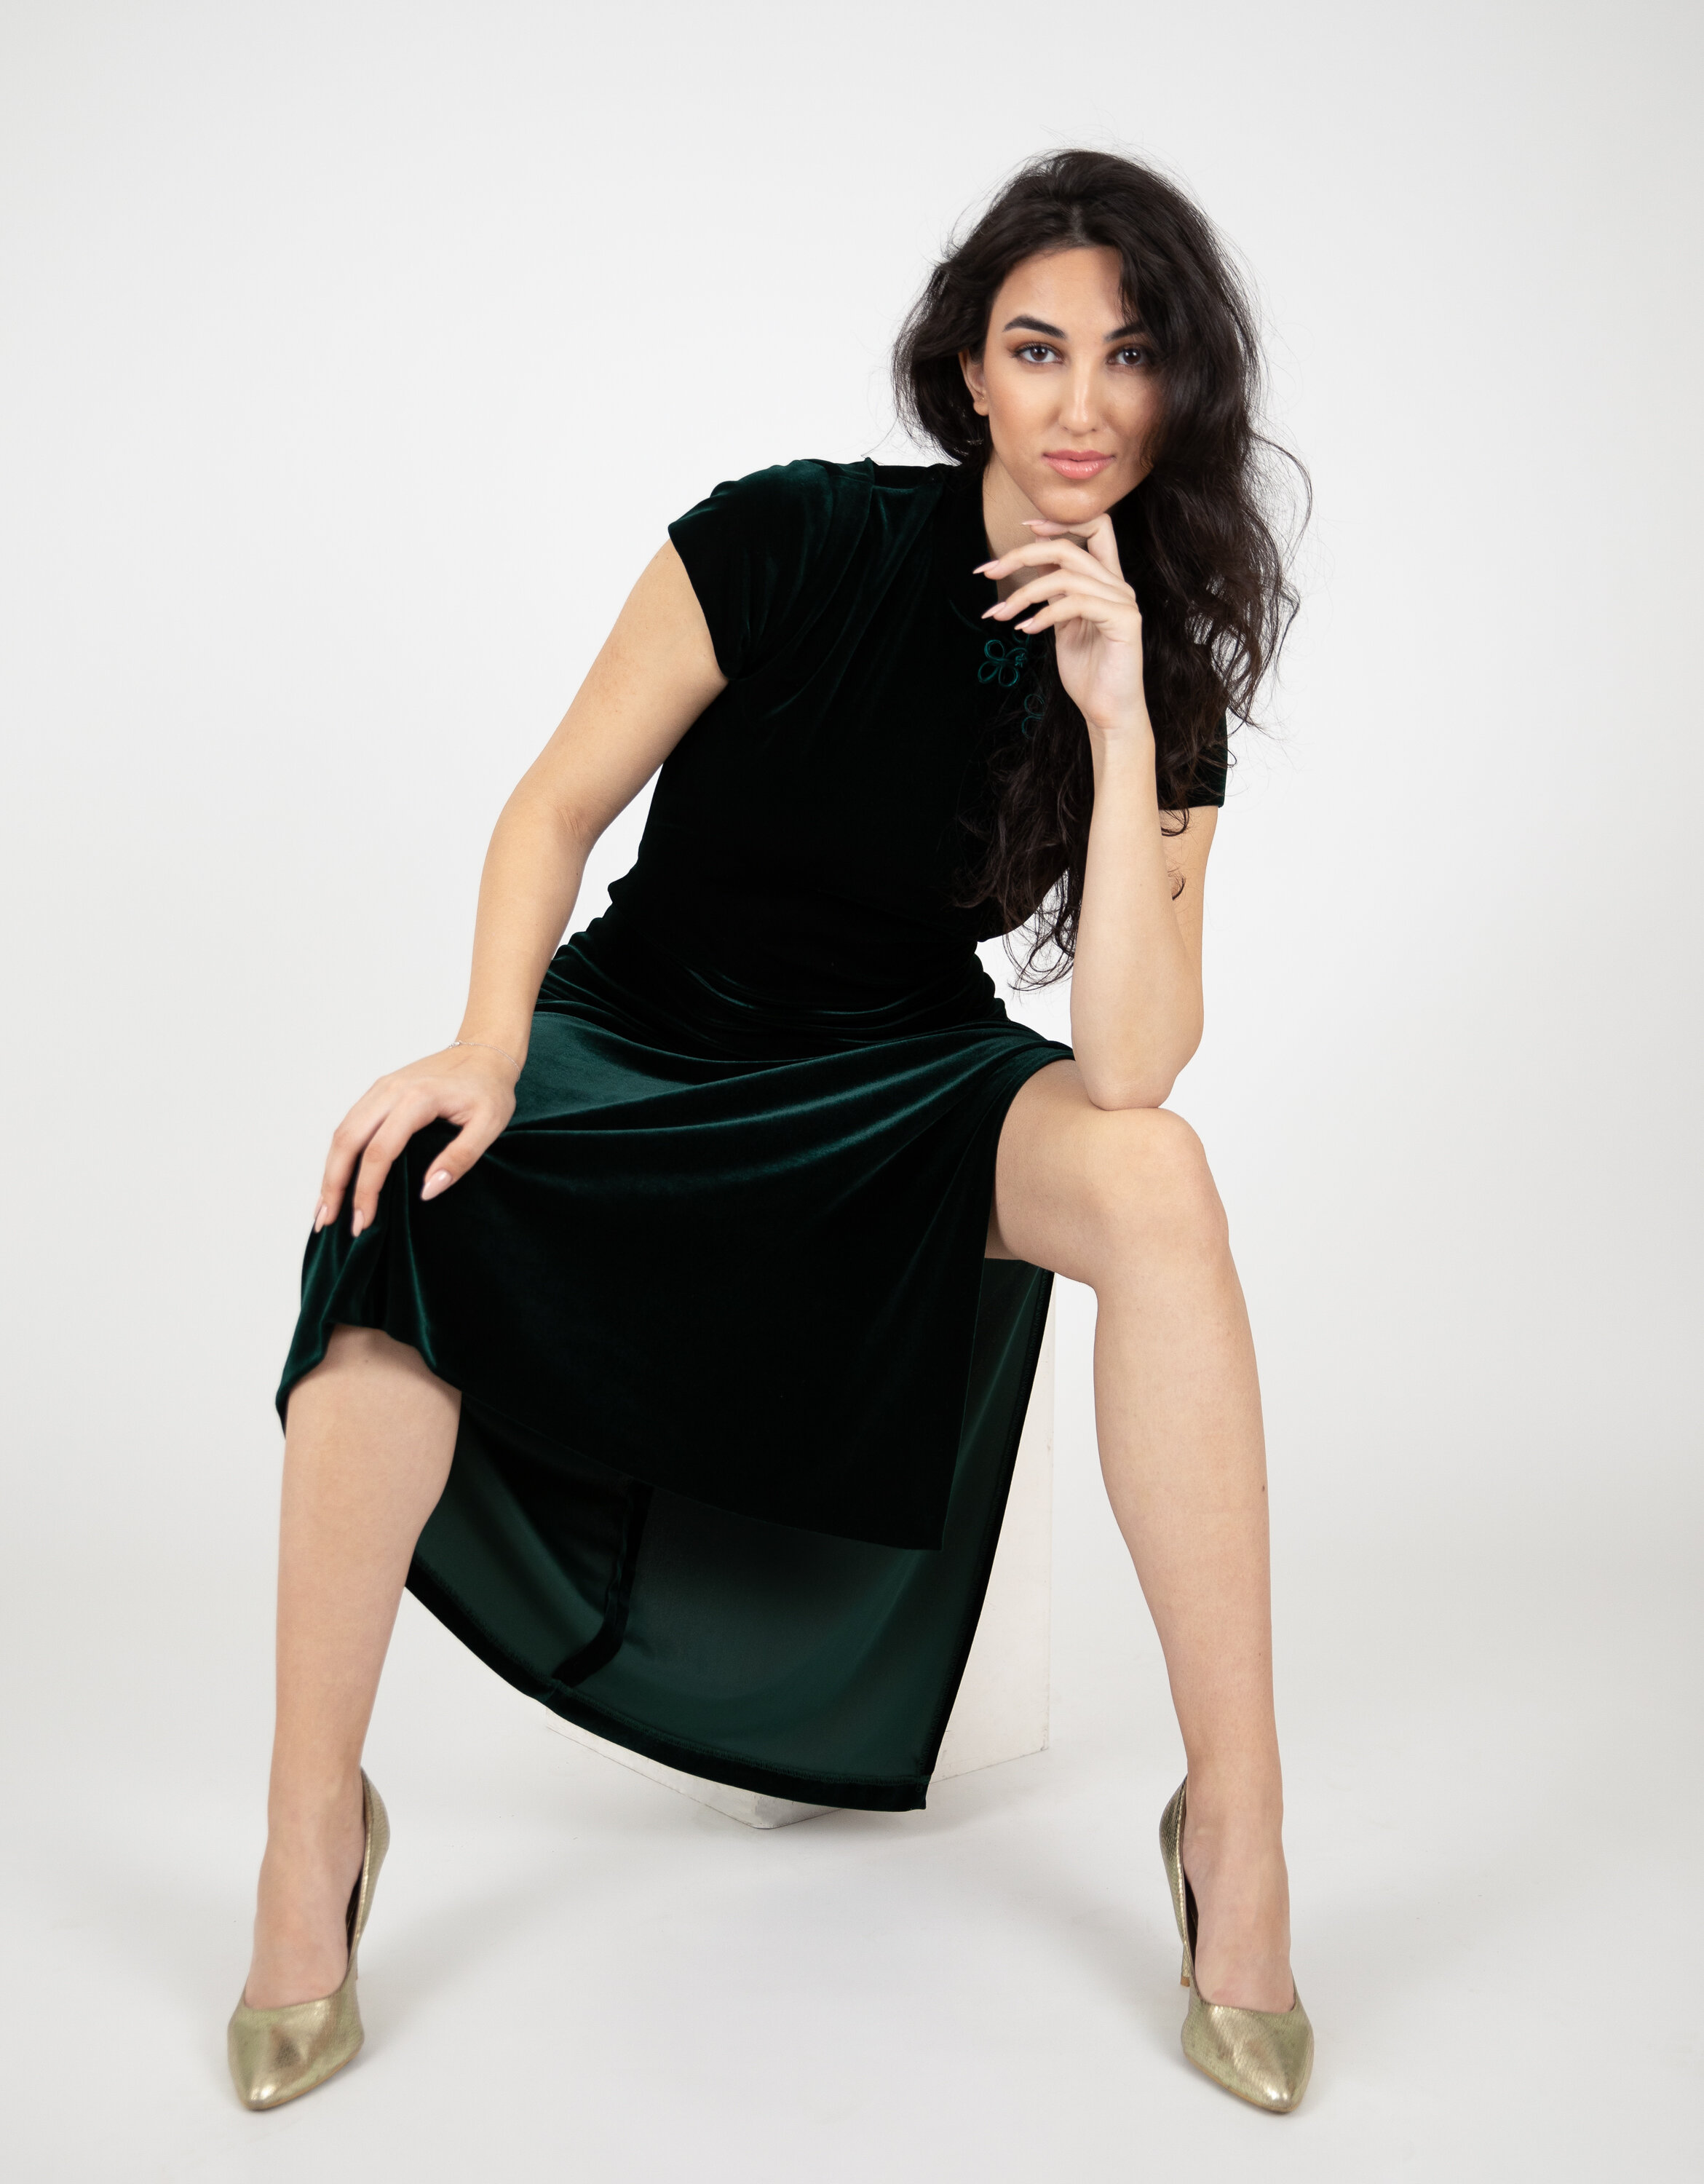
Watch your posture no matter if you are sitting or standing. As you can see with these three models, all were aware of how to position their body to give themselves the most flattering look. Also note in examples 2 and 4, standing with one leg in front of the other is quite flattering and gives the model a look of confidence and elegance. Finally, in example 2, you will notice a slight lean of the head, and then in example 3 a slight lean of the body as well, both add a sense of playfulness to the pose.
Example 1 Anastasia

Example 2 Olga

Example 3 Olga

Example 4 Arielle
Put your chin forward and slightly down to accentuate the jawline of the model and prevent the look of a double chin. By doing this, the model will always look GREAT, such as in examples 5 and 6.
Example 5 Nina

Example 6 Kassidy

Try to keep your neck visible, whenever possible. In examples 7 and 8 the visible evidence of the model’s neck adds to the creative beauty of each photo. The model in example 9, has no neck showing, but the photo works because of the angle posed by the model.
Example 7 Victoria

Example 8 Megan

Example 9 Victoria

Cross your arms or not? The clarity of the photos, the color of the model’s clothing, the crop of the photo, the confidence of the model are factors that influence the use of crossed arms. There are times where crossing arms works perfectly as you will see in the examples 10 and 11 below; however, there are times when crossing your arms turns your whole figure into a blur, such as in example 12 And there at times when crossing one’s arms can be a power look, such as example 13.
Example 10 Ashley

Example 11 Ashley

Example 12 Alexa

Example 13 Anastasia

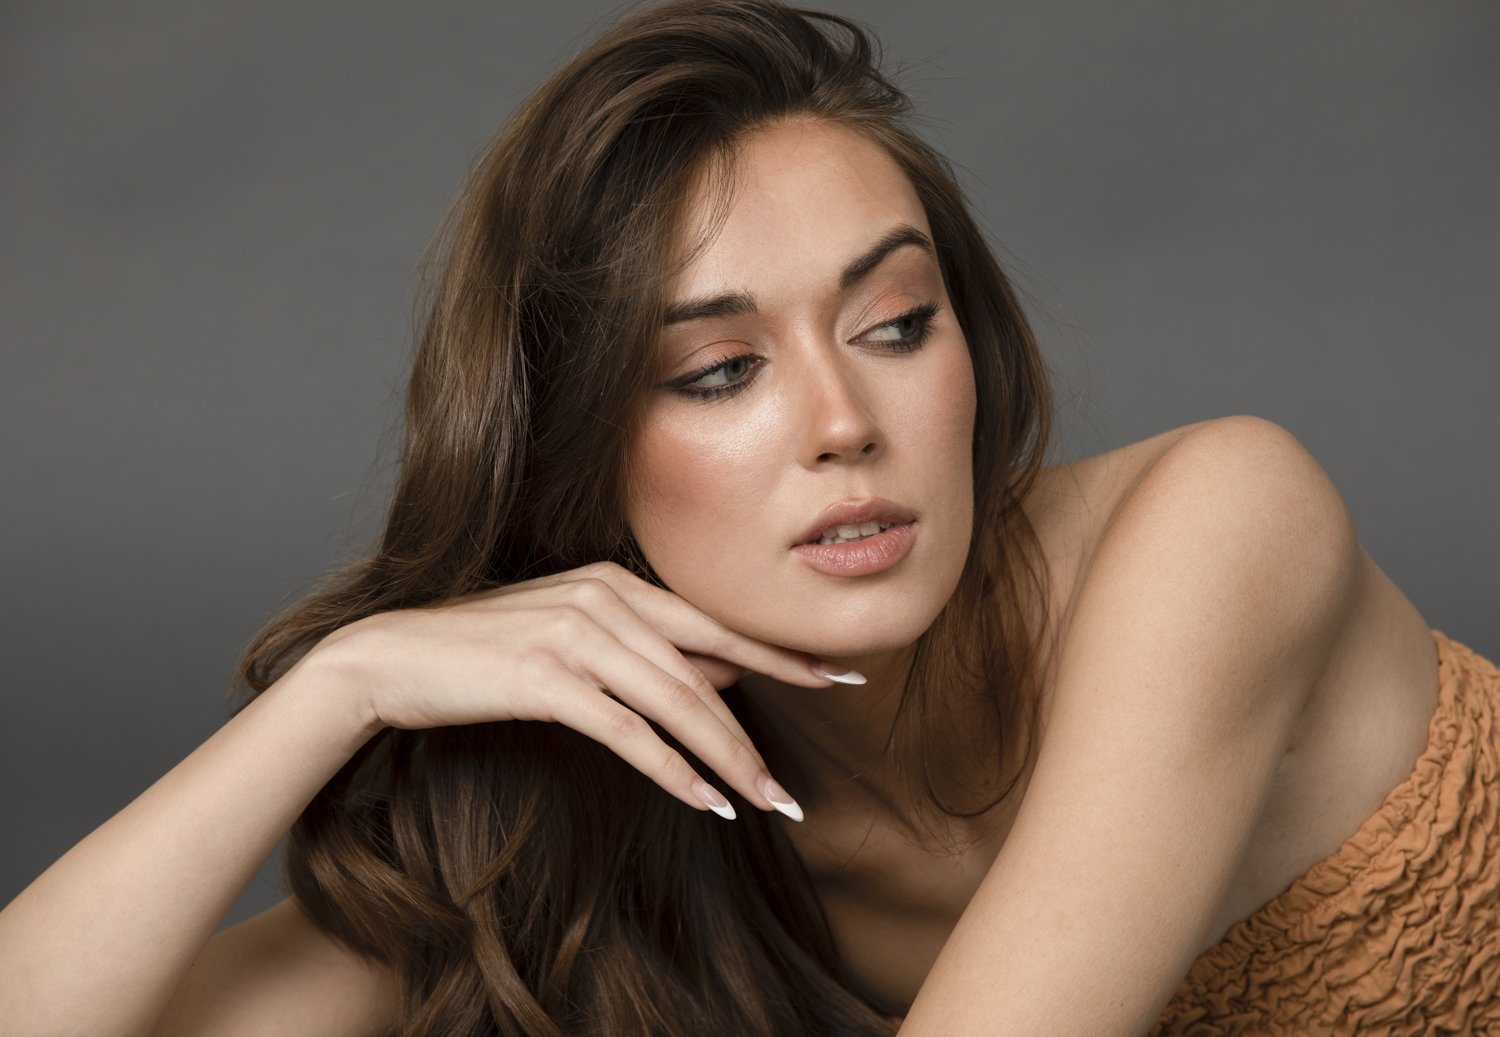
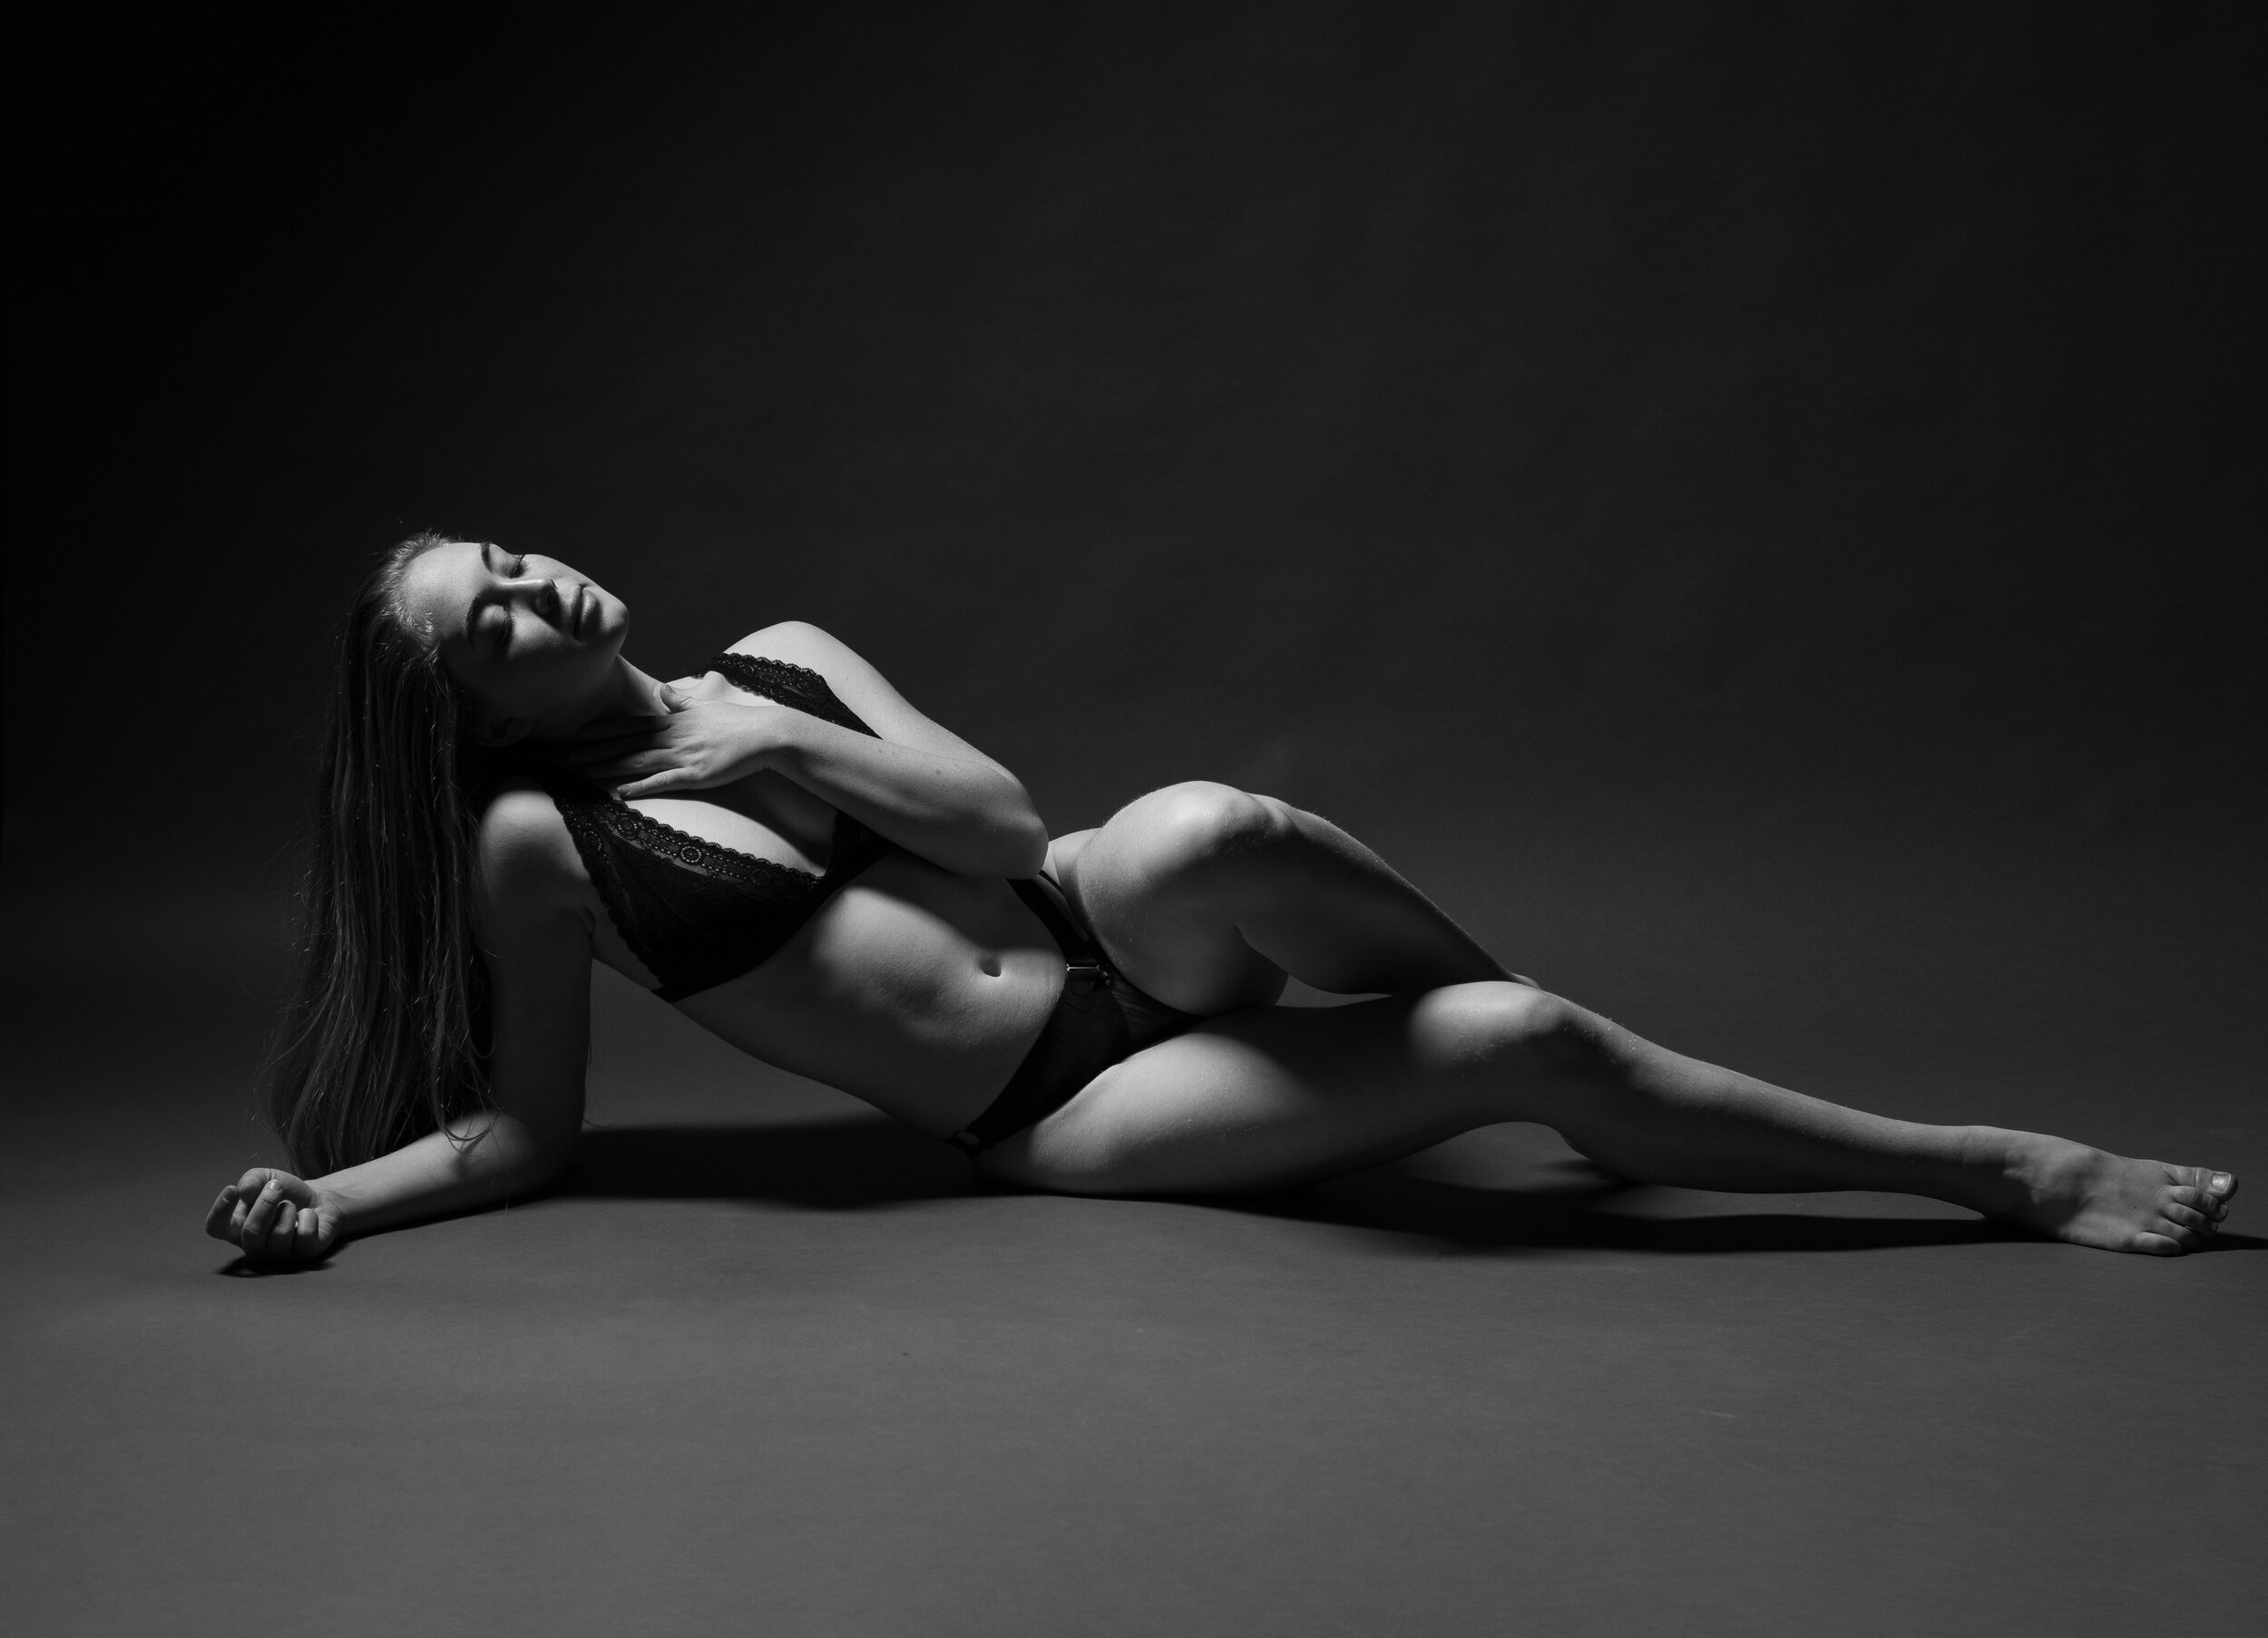
Touching your face and Intimate Touching are poses which can work well with close-up portraits, half-body, as well as full body shots. Exactly where and how the model places her hand can change the mood of the photo from glamorous to serious and from playful to sensual. The elegant placement of the fingers plays a critical role in nailing that one perfect photo. In the following examples, notice the exact placement of the model’s hand and the mood this action creates in the photo.
Example 14 Victoria

Example 15 Ashley

Examples 16 Hannah

Examples 17 Hannah
Example 18 Anastasia touching hair

Example 19 Grace

Example 20 Megan
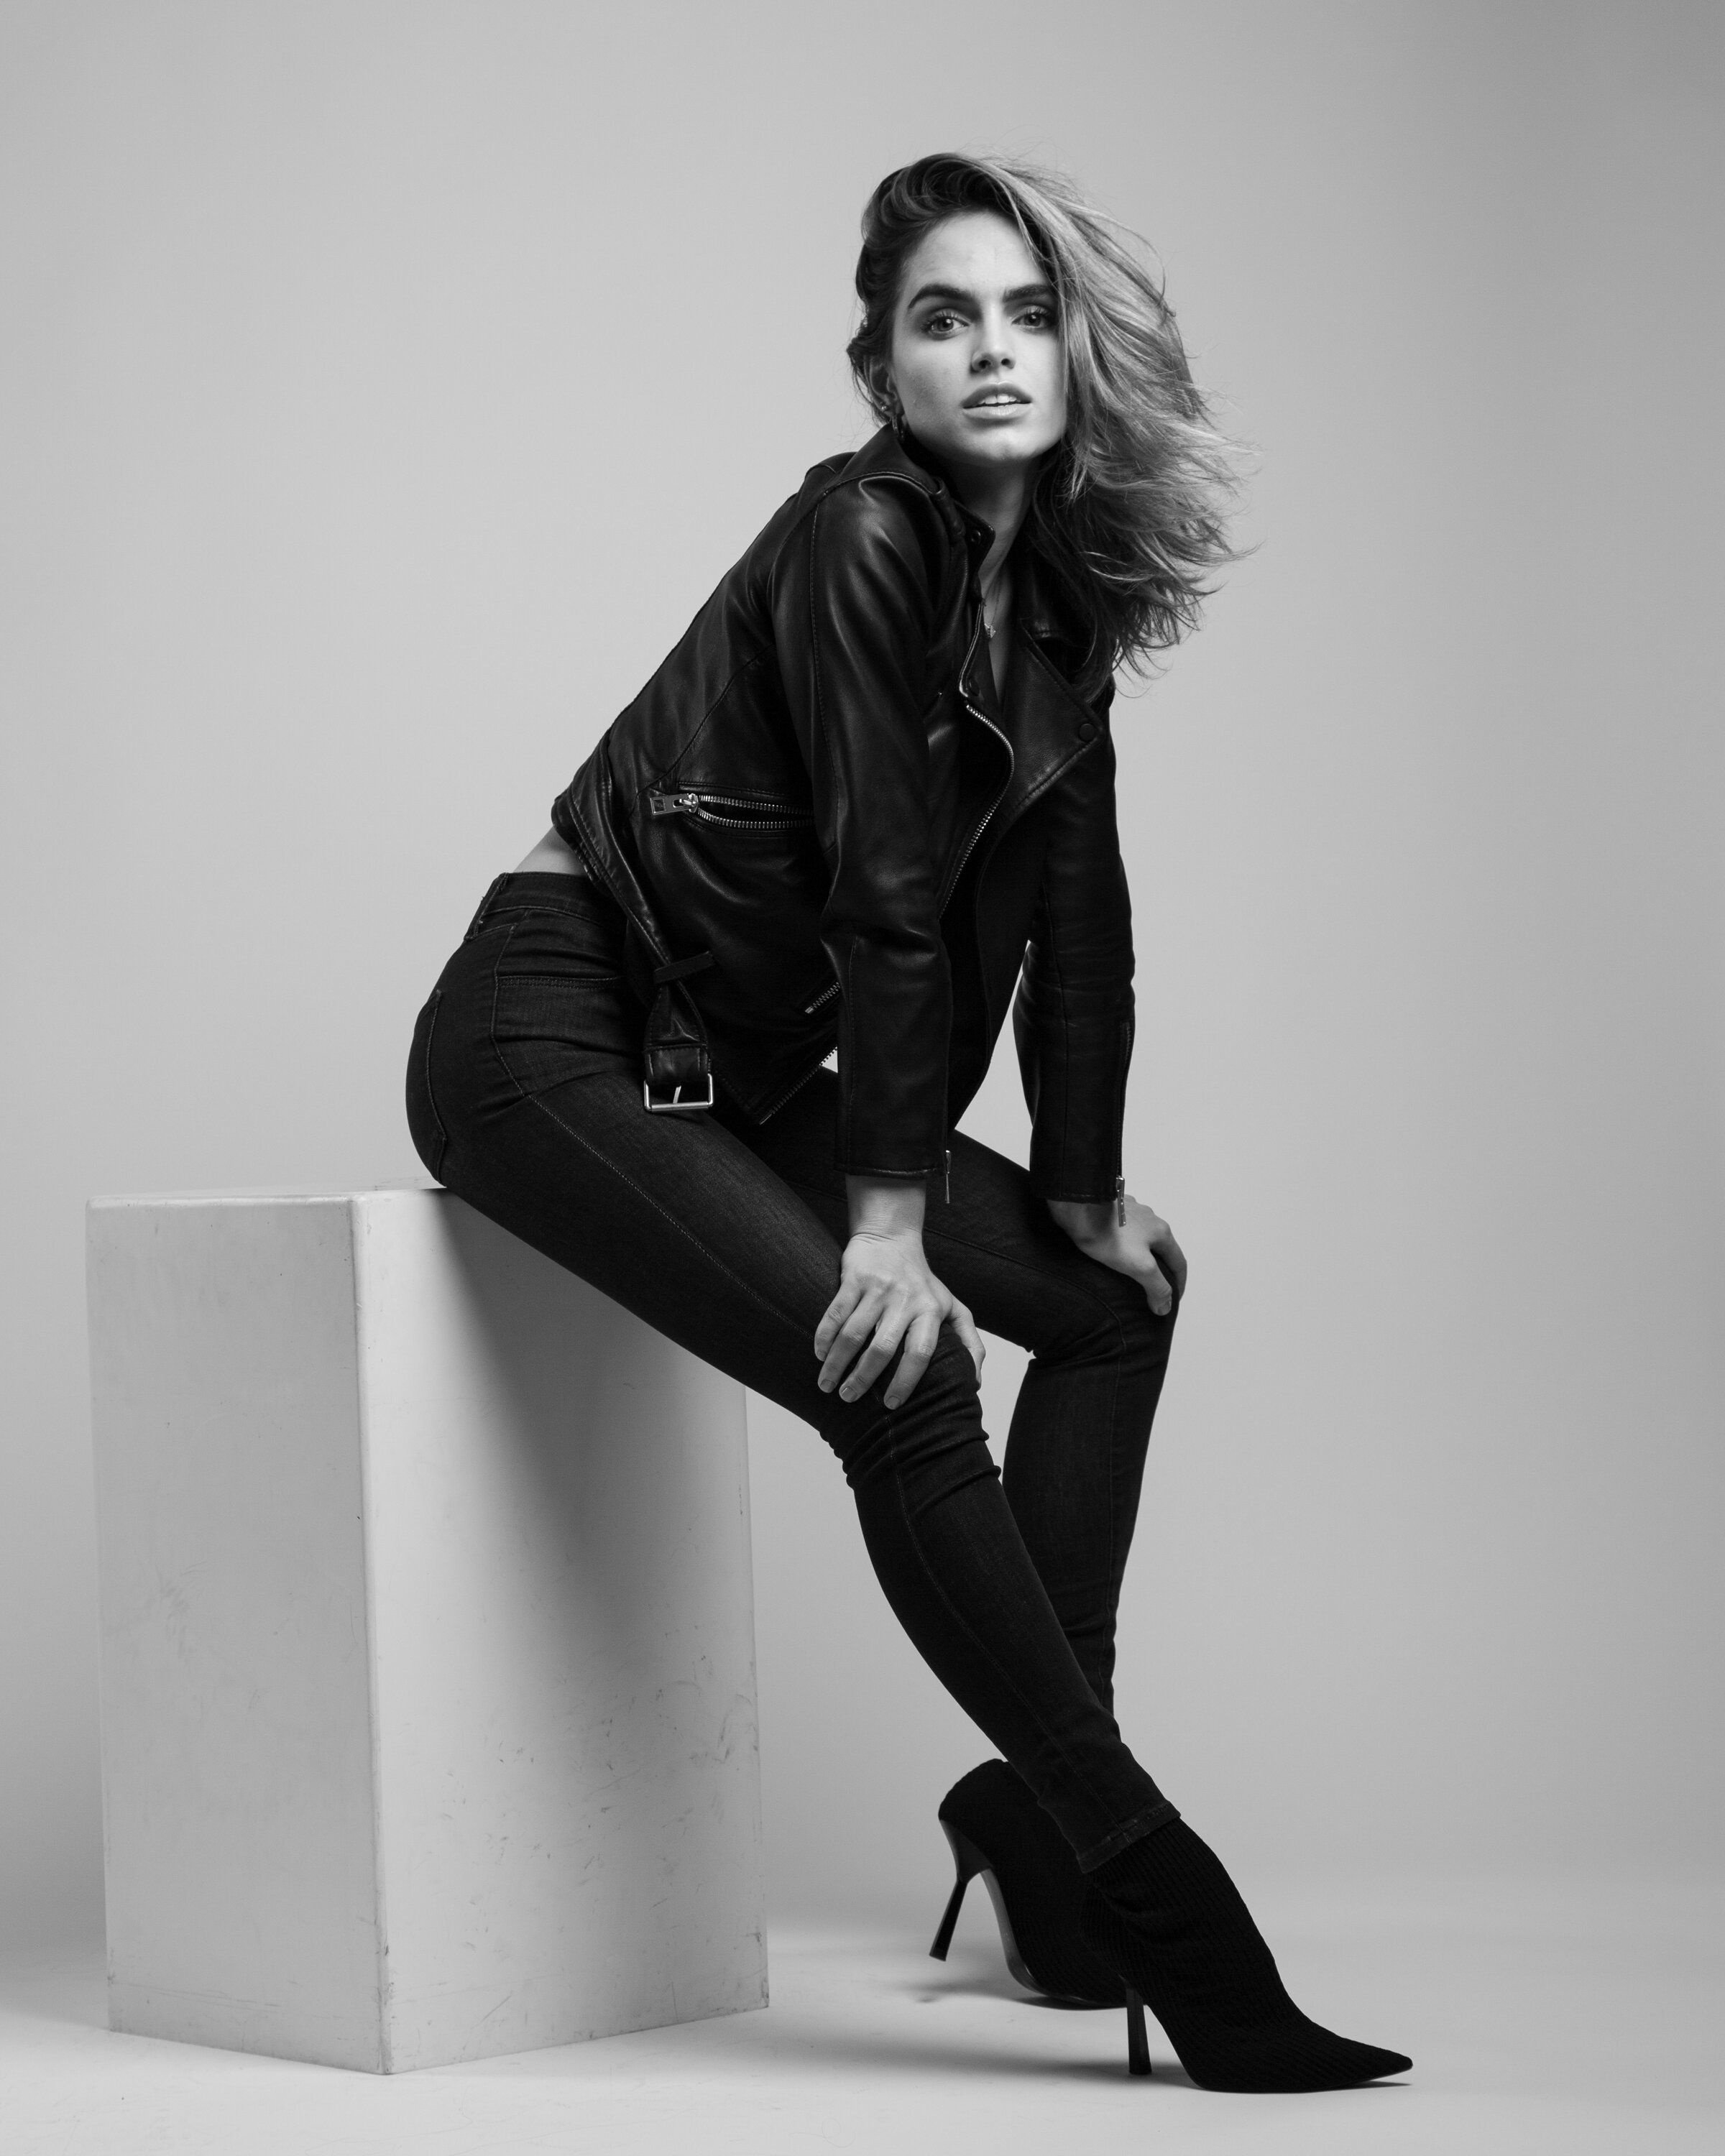
Change the Angle by perhaps turning the torso of the model, but be careful that you do not turn the model’s torso too far from the camera lens or you may end up with a model with a wide waist or with shoulders that may appear round and narrow. The wrong angle can also cause arms and perhaps legs to appear shorter. The following are examples of correct model placement.
Example 21 Hannah

Example 22 Grace

Example 23 Olga

Avoid baggy clothes on models (examples 25 and 26), but definitely include graceful flowing dresses of all types (example 24)
Example 24 Arielle

Example 25 Paige

Example 26 Alexa

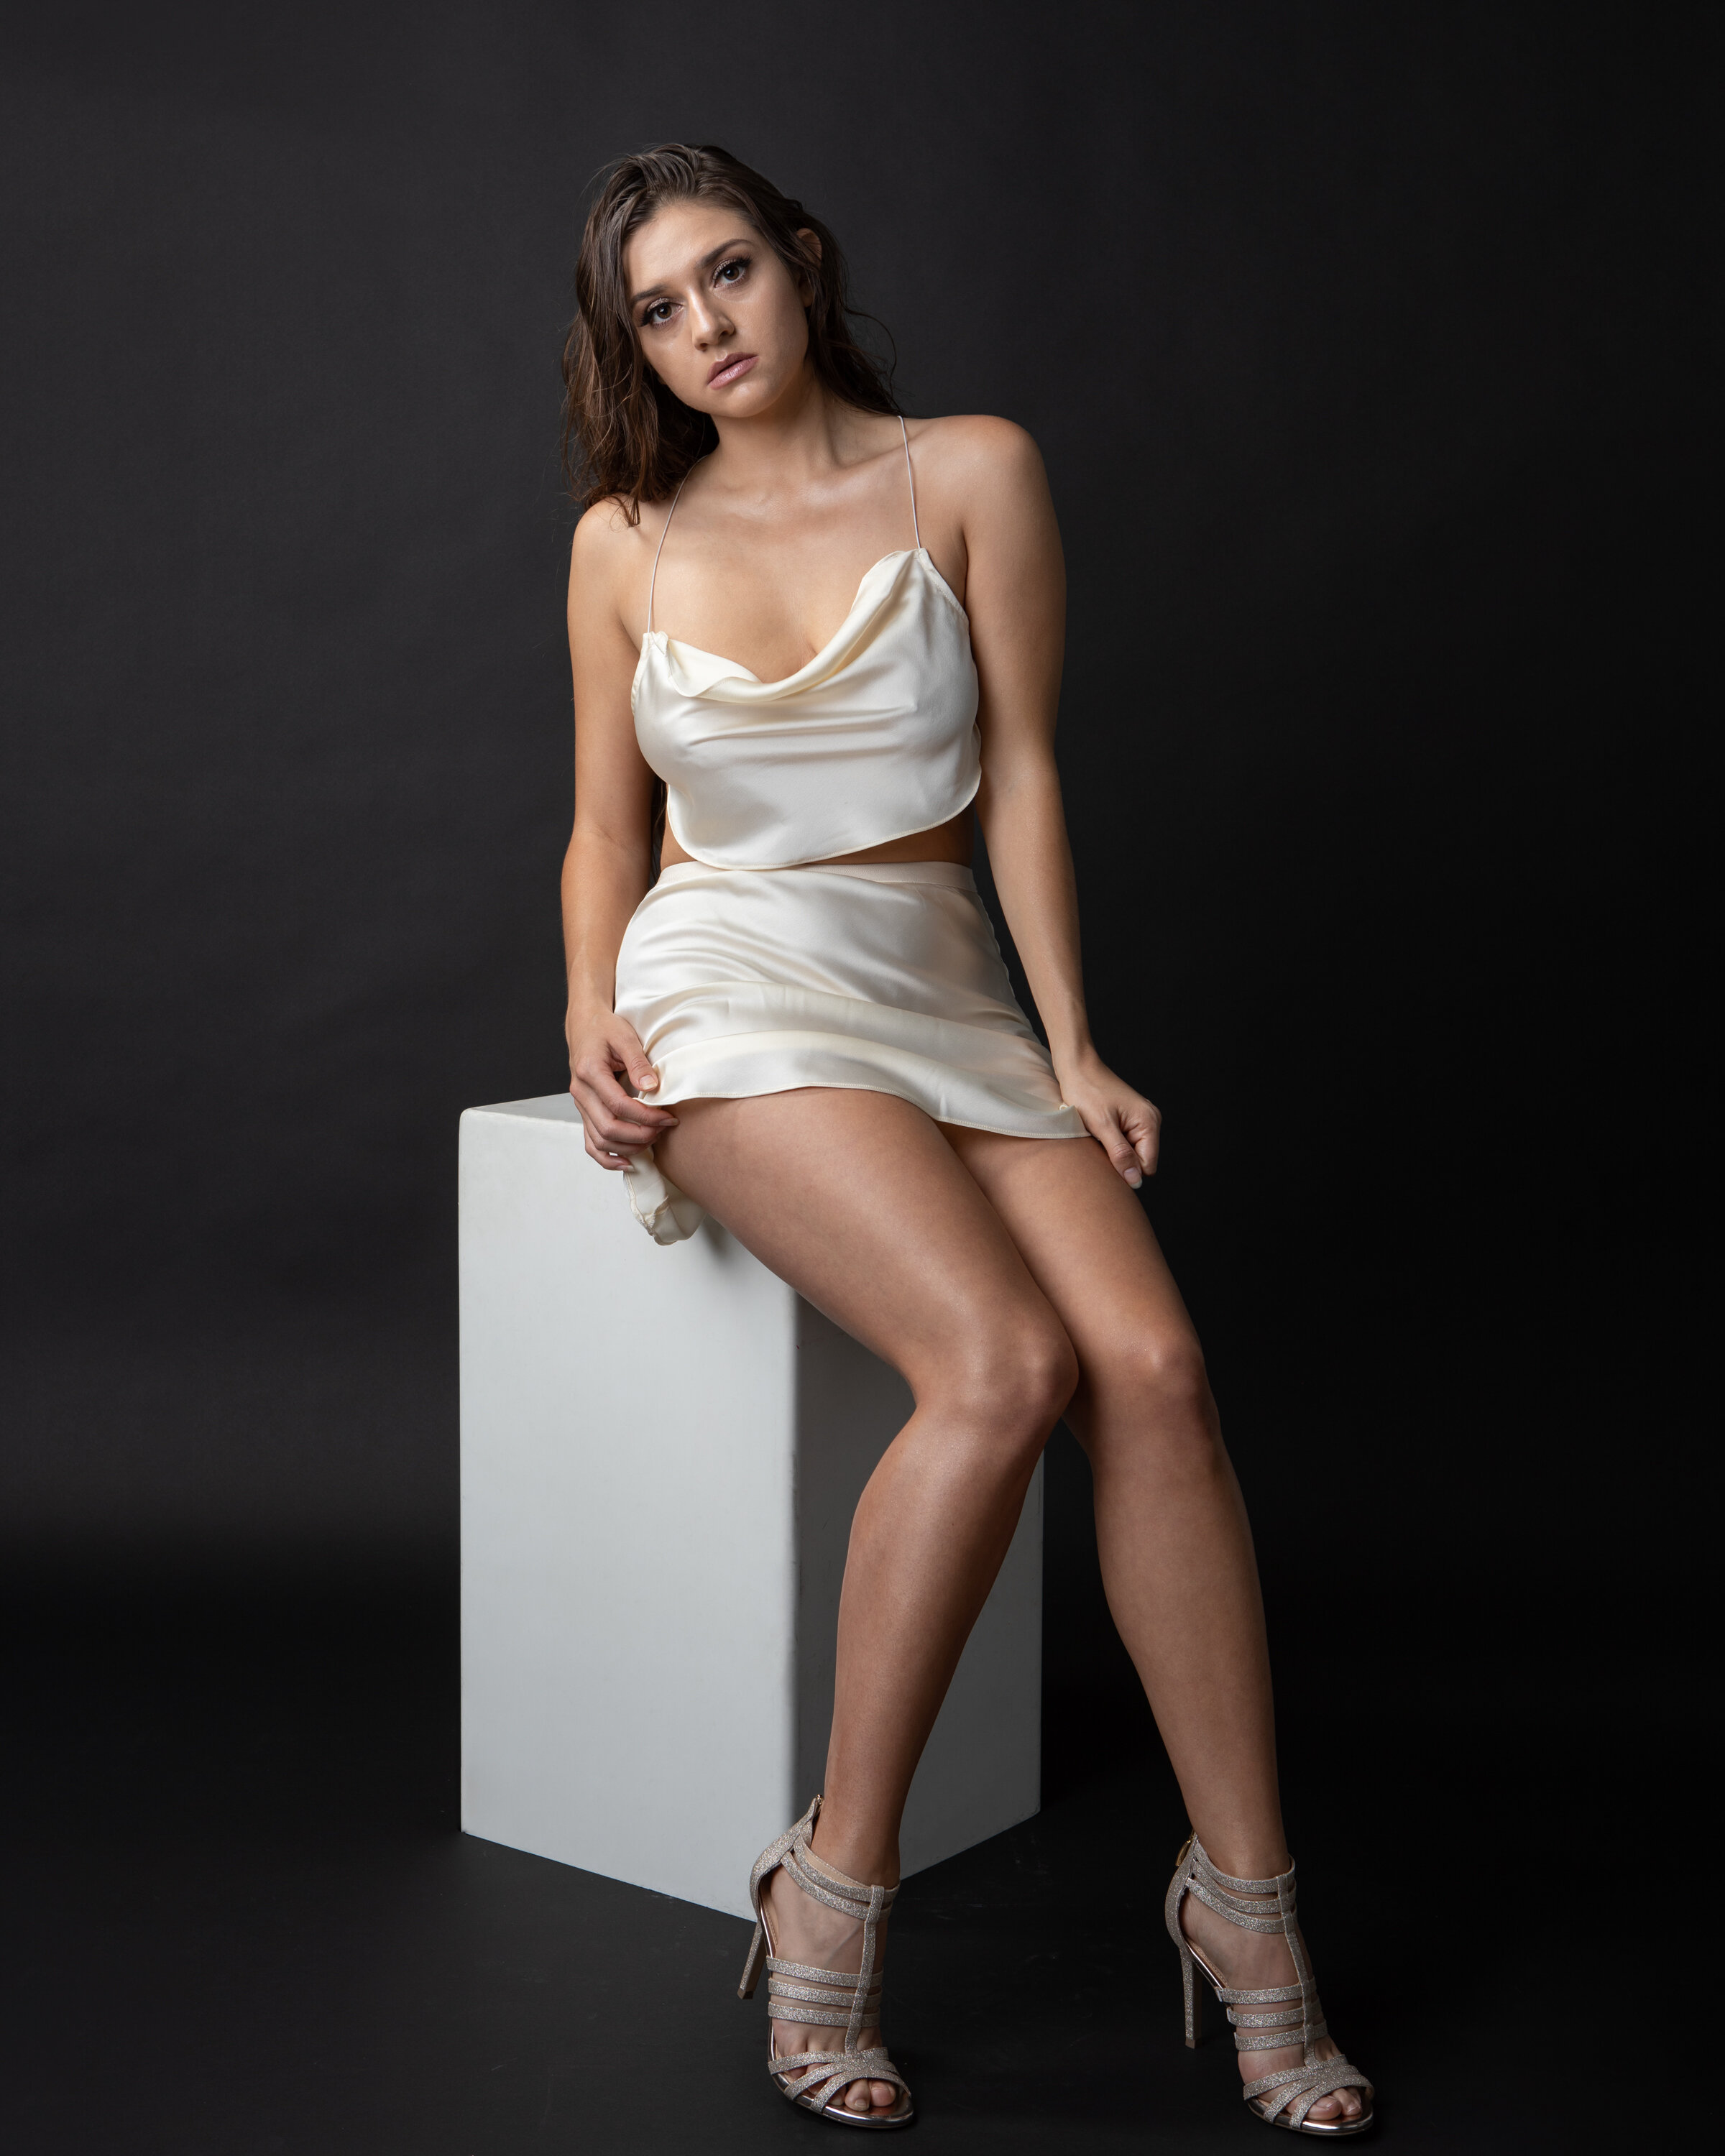
Pay attention to your arms when standing and sitting. Some models are not quite sure what to do with their arms/hands when sitting. Here are three examples (27-29) of models sitting and allowing one arm to completely relax while the other hand touches their chin creating moods that range from content to powerful. Next you will find four examples (30-33) of models standing with hands down to their side. In examples 30 and 31 you will notice that standing straight or somewhat straight with arms placed at the model’s side does not qualify as a creative photographic pose. However, you will notice that in example 32, the model has her hands at her hips in a power pose and in example 33 the model, with hands directly at her side, is taking a step forward accentuating the curves of her body and the natural flow of her arms.
Example 27 Alexa
Example 28 Anastasia
Example 29 Nina

Example 30 Karina

Example 31 Alexa

Example 32 Alexa

Example 33 Arielle

Create visual lines, shadows, angles, and combine straight and curved lines to produce exciting and dramatic photos. In examples 34 and 35 two models are creating shadows on the backdrop. In example 36, the model uses her body and clothes to create angles. In examples 37-39, the models use only their bodies to create natural curves. Examples 40 and 41 show photos in which model placement combines straight and curved lines along the backdrop of the photo.
Example 34 Rosemary
Example 35 Grace

Example 36 Alexa

Example 37 Karina
Example 38 Anastasia

Example 39 Karina

Example 40 Rosemary

Example 41 Megan

Finally have fun with the model. Laughter goes a long way in creating the perfect photoshoot. Having fun comes in many forms such as, using an unplanned prop in example 42, using a planned prop in different ways (examples 43 and 44), utilizing a distraction off to the side of the photoshoot (example 45), building laughter upon a model relaxing between shots (example 46), and a model being creative and having fun during an outdoor photoshoot (example 47).
Example 42 Nina

Examples 43 Olga
Examples 44 Olga
Example 45 Olga
Example 46 Olga

Example 47 Grace
There are some people who always look great and are naturally photogenic, but one does not need to be a professional model to look beautiful in a portrait. Follow the above recommendations and you will look fabulous in every photo of your next photoshoot.

Cropping
A fellow photographer and I recently debated the relative merits of two types of cropping. (1) cropping an image during a shoot by zooming in with your lens and (2) cropping during the postproduction process. As we know, using your camera’s zoom changes your focal length and gives you a closer look at an image resulting in a creative perspective of the image before you press the shutter button. However…
A fellow photographer and I recently debated the relative merits of two types of cropping. (1) cropping an image during a shoot by zooming in with your lens and (2) cropping during the postproduction process. As we know, using your camera’s zoom changes your focal length and gives you a closer look at an image resulting in a creative perspective of the image before you press the shutter button. However, the true sense of the term cropping is taking your image and trimming out portions of the photo you do not want in your frame…and that happens in postproduction using Lightroom and/or photoshop. Thereby, what remains within the crop becomes the final total image to further edit. Does cropping degrade resolution? It can to a slight degree; but with today’s high-resolution cameras, you can do some significant cropping and still maintain high resolution for high-quality prints.
One big advantage to post-production cropping is that you can compose and reframe a photo without having to go back and reshoot the photograph. When you are in the field (or in a photo studio), it is always a good idea to frame an image loosely and crop it in post-production. There are times though when you can completely visualize the end result and you want to shoot tight and avoid cropping. If this is you, you should still leave room to crop, just in case you need to straighten a crooked horizon, delete dead space or remove a distracting element from one or more edges of your photo.
Whenever possible, you want to get the image framed exactly where you want it in the viewfinder and then allow your artistic creativity to rule during post-production.
In the two examples below, note the before crop and post-production cropping:
Example 1 is from the Teton area along the Snake River in Wyoming:


In Example 2, from Devil’s Geden in Escalante, Utah there are two crops to get the final image:

Crop 1:
Crop 2:

Let me briefly mention “extreme cropping.” Shoot a scene loosely, adjust any problems, such as converging verticals and finally adjust perspective to fit what you are looking for in a photo without sacrificing any critical components of the image. In the example below of extreme cropping, you see both the “before cropping” and how the “after cropping” delivers the WOW factor that can actually increase the quality and marketability of a photo.
Portion of an image of the Red Hills of the Tetons Before Cropping:

Final Image After Cropping:

Cropping can be magical in that it can balance an image, and in the above example, modify perspective and aspect ratio. Surprise yourself! Select some of your old landscape photos and experiment with what a little or a lot of cropping can do to increase the drama.

The Humble Tripod
Did you ever listen to photographers talk about what they believe is most important, such as “What type of camera do you use?” and “Have you used a mirrorless camera body yet?” “What lenses do you have and which one do you like the most?” or “How many photo trips have you been on?” While these are all good questions, rarely do you hear…

Did you ever listen to photographers talk about what they believe is most important, such as “What type of camera do you use?” and “Have you used a mirrorless camera body yet?” “What lenses do you have and which one do you like the most?” or “How many photo trips have you been on?” While these are all good questions, rarely do you hear, “Do you use a tripod and what kind do you use?” Photographers heavily rely on features of a camera body or lens, such as 5-axis image stabilization, steady shot image stabilization, in-body vibration reduction, optic image stabilizer and shutter speed. (I probably fell into this category at one time) or some even say, “I can hold the camera/lens tight to my body so it will not move.” Well, perhaps some of that may work, but when you’re out in the field and you want great photos, you better be using a sturdy tripod. For me the humble tripod has become an indispensable part of my equipment. And it was not until just recently, that I fully learned my lesson.
In 2019, on a ten-day photo trip to Venice, I wanted to pack light so I could take more camera equipment, as well as a laptop. I thought about what I could sacrifice to save myself the burden of lugging around the necessary suitcase, camera bag, and backpack. Then it dawned on me; what if I take a light-weight travel tripod and ball head?
Upon my arrival, I left the tripod in my room, feeling that it was too heavy and bulky and I was tired after a long trip. As I walked around Venice, I took photo after photo of canals, gondoliers, amazing architecture, and a gorgeous sunset. Much later, I realized that I had captured good images, but not great. However, if I had my tripod, I would have captured great images, especially that sunset, the most exquisite of the entire Venice stay. In Venice I carried out several panning photoshoots. To do this with accuracy, the camera had to stay on a plane parallel to the horizon which can only be achieved with a tripod for consistent and perfect results. When I did take my tripod along on several shoots, I paid the price for bringing a light weight one, as heavy winds caused camera shake, even with the tripod, while executing long exposure shots during early morning blue hour and sun rise.
Fast forward to 2020 on a photography trip to the Grand Staircase Escalante in Utah, where my new and somewhat more expensive light-weight travel tripod and ball head simply collapsed on me and I had to borrow one, with a learning curve that took some of the fun out of the night photo shoots. That same year in Canyonlands National Park, another new travel tripod let me down when one of the legs broke, and I reluctantly had to borrow a tripod for parts of that photo adventure.
Finally in 2021, I purchased a new ball head from ReallyRightStuff. Together with my new Manfroto tripod, I headed off on another photography trip to the Grand Tetons in Wyoming. All was nearly perfect until the rough terrain damaged my tripod legs. Thankfully, duct tape helped save the tripod for the rest of the trip and provided me with amazing photos at every location. Now my tripod and ballhead are “really right” and I am ready for my next adventure.
For me, there’s no debate that a tripod is the only accessory that can improve every picture you take, even better than image stabilization (IS). Don’t get me wrong, IS helps a lot, but the maximum benefit one gets from IS, at the most, is six f-stops. For the novice, IS increases the length of time you can keep the shutter open before the awful camera shake comes into play. However, when you use a tripod, you can shoot shutter open for minutes, or if needed, hours. Did you ever try to do macro photography without a tripod? If your goal is to increase blur in your photo, then this is the way to shoot macro. However, if you want crystal clear macro images, a tripod is required, especially when depth-of-field is measured in nanometers; even normal 1/100 second shots will cause visible degradation of the photo, especially if there is the slightest breeze in the air.
One last benefit to using a tripod is that it shifts a photographer’s thinking from rapid “compose, click, click, click” to “take needed time to compose, more time to examine highlights and dark areas of the scene, and continue to build the image before your finger hits the shutter button.” If my experiences haven’t convinced you, try using a tripod in situations where you haven’t in the past and see the difference for yourself. Interested in hearing more, give me a call or text at 949-518-9059 or email me at jerryganisphotography@gmail.com.
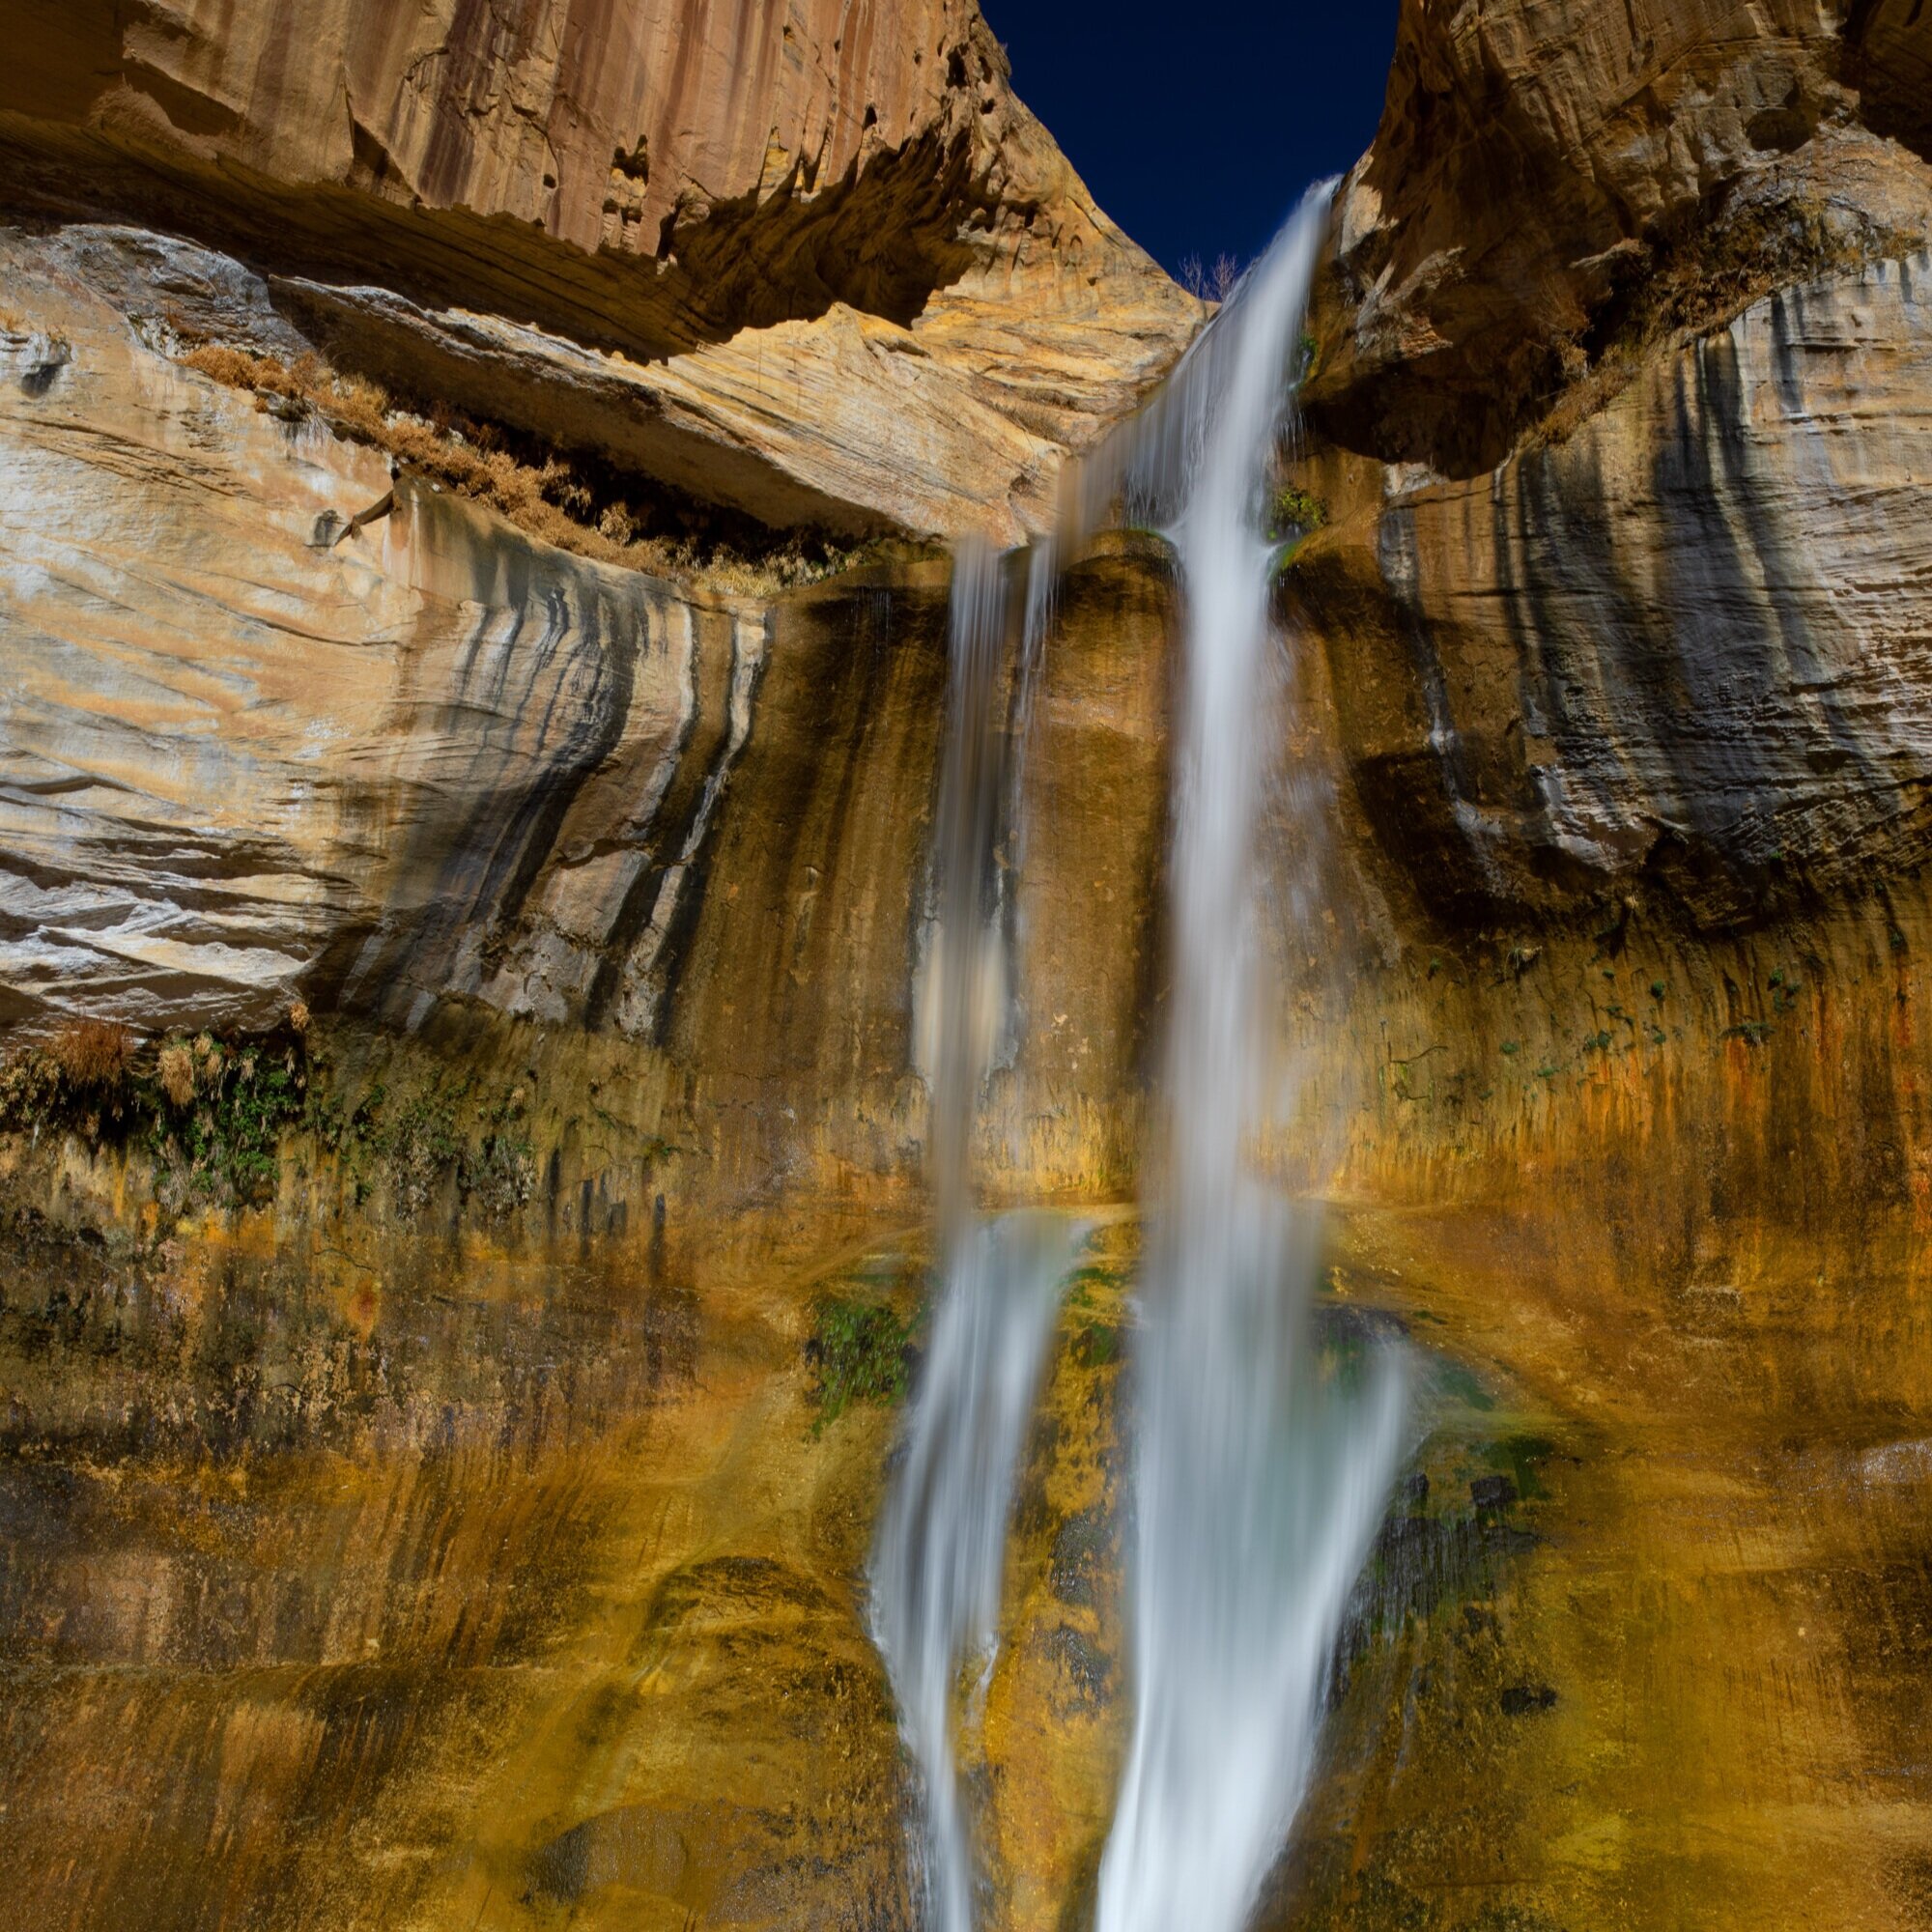
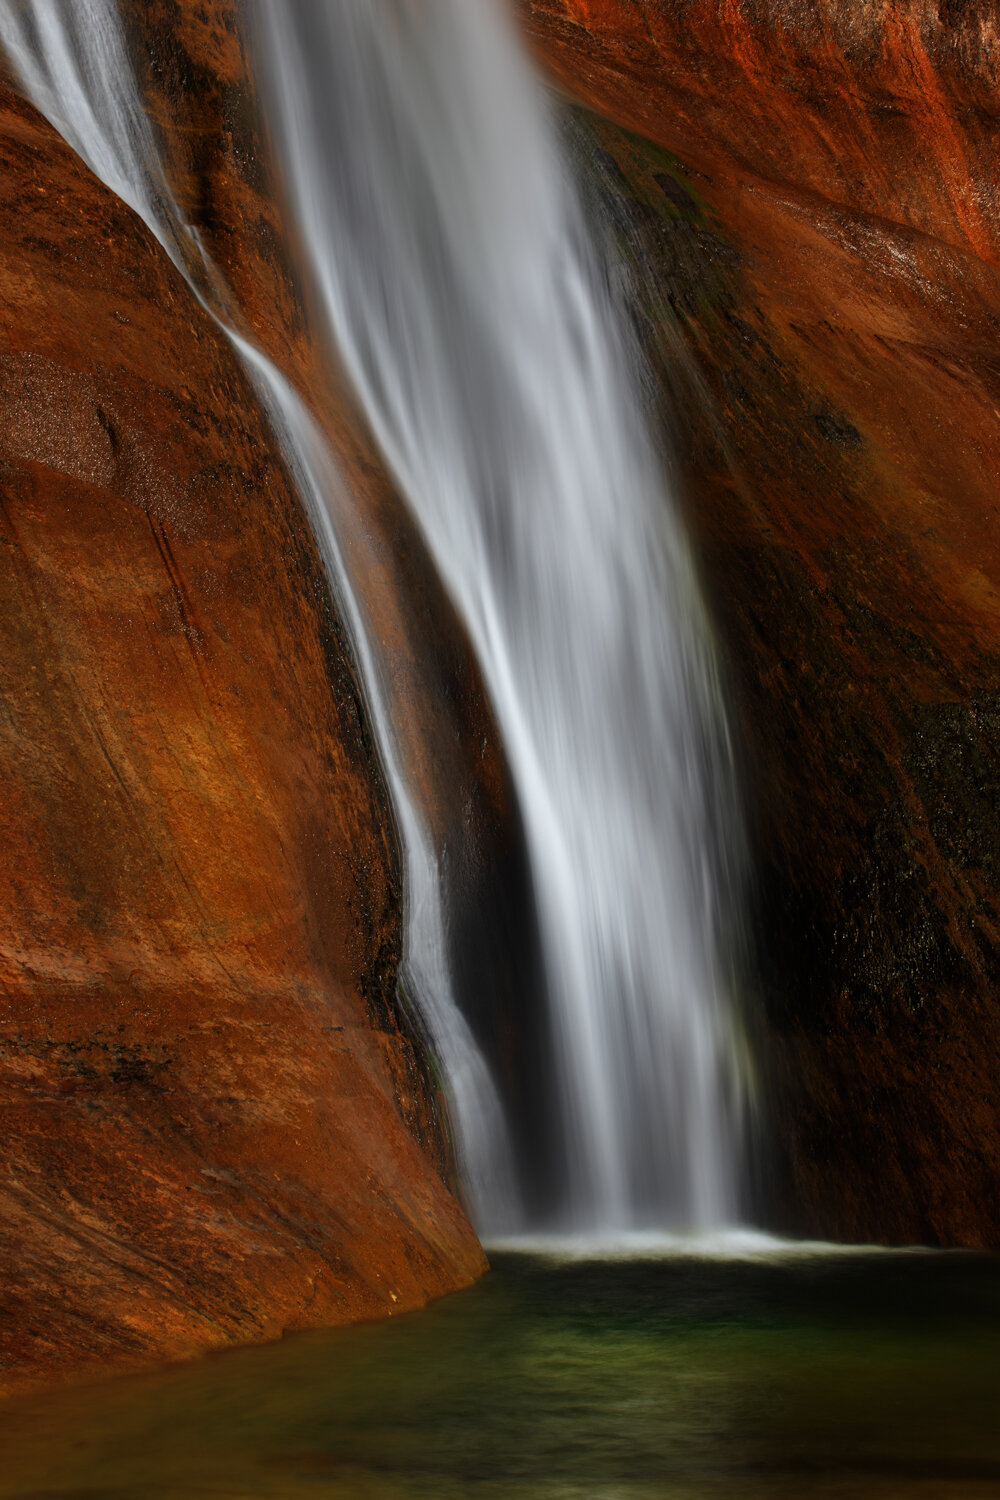
Lower Calf Creek Falls
On a cold morning in September, I started out from Escalante, Utah to Lower Calf Creek Falls. I was dressed appropriately for the trip with several layers of clothing and of course, my camera bag and trusty tripod and not one but two bottles of water. The drive along Highway 12 was only 15 miles and by the time I approached the Calf Creek Campground the sky was filled with the slightest hint of dawn…

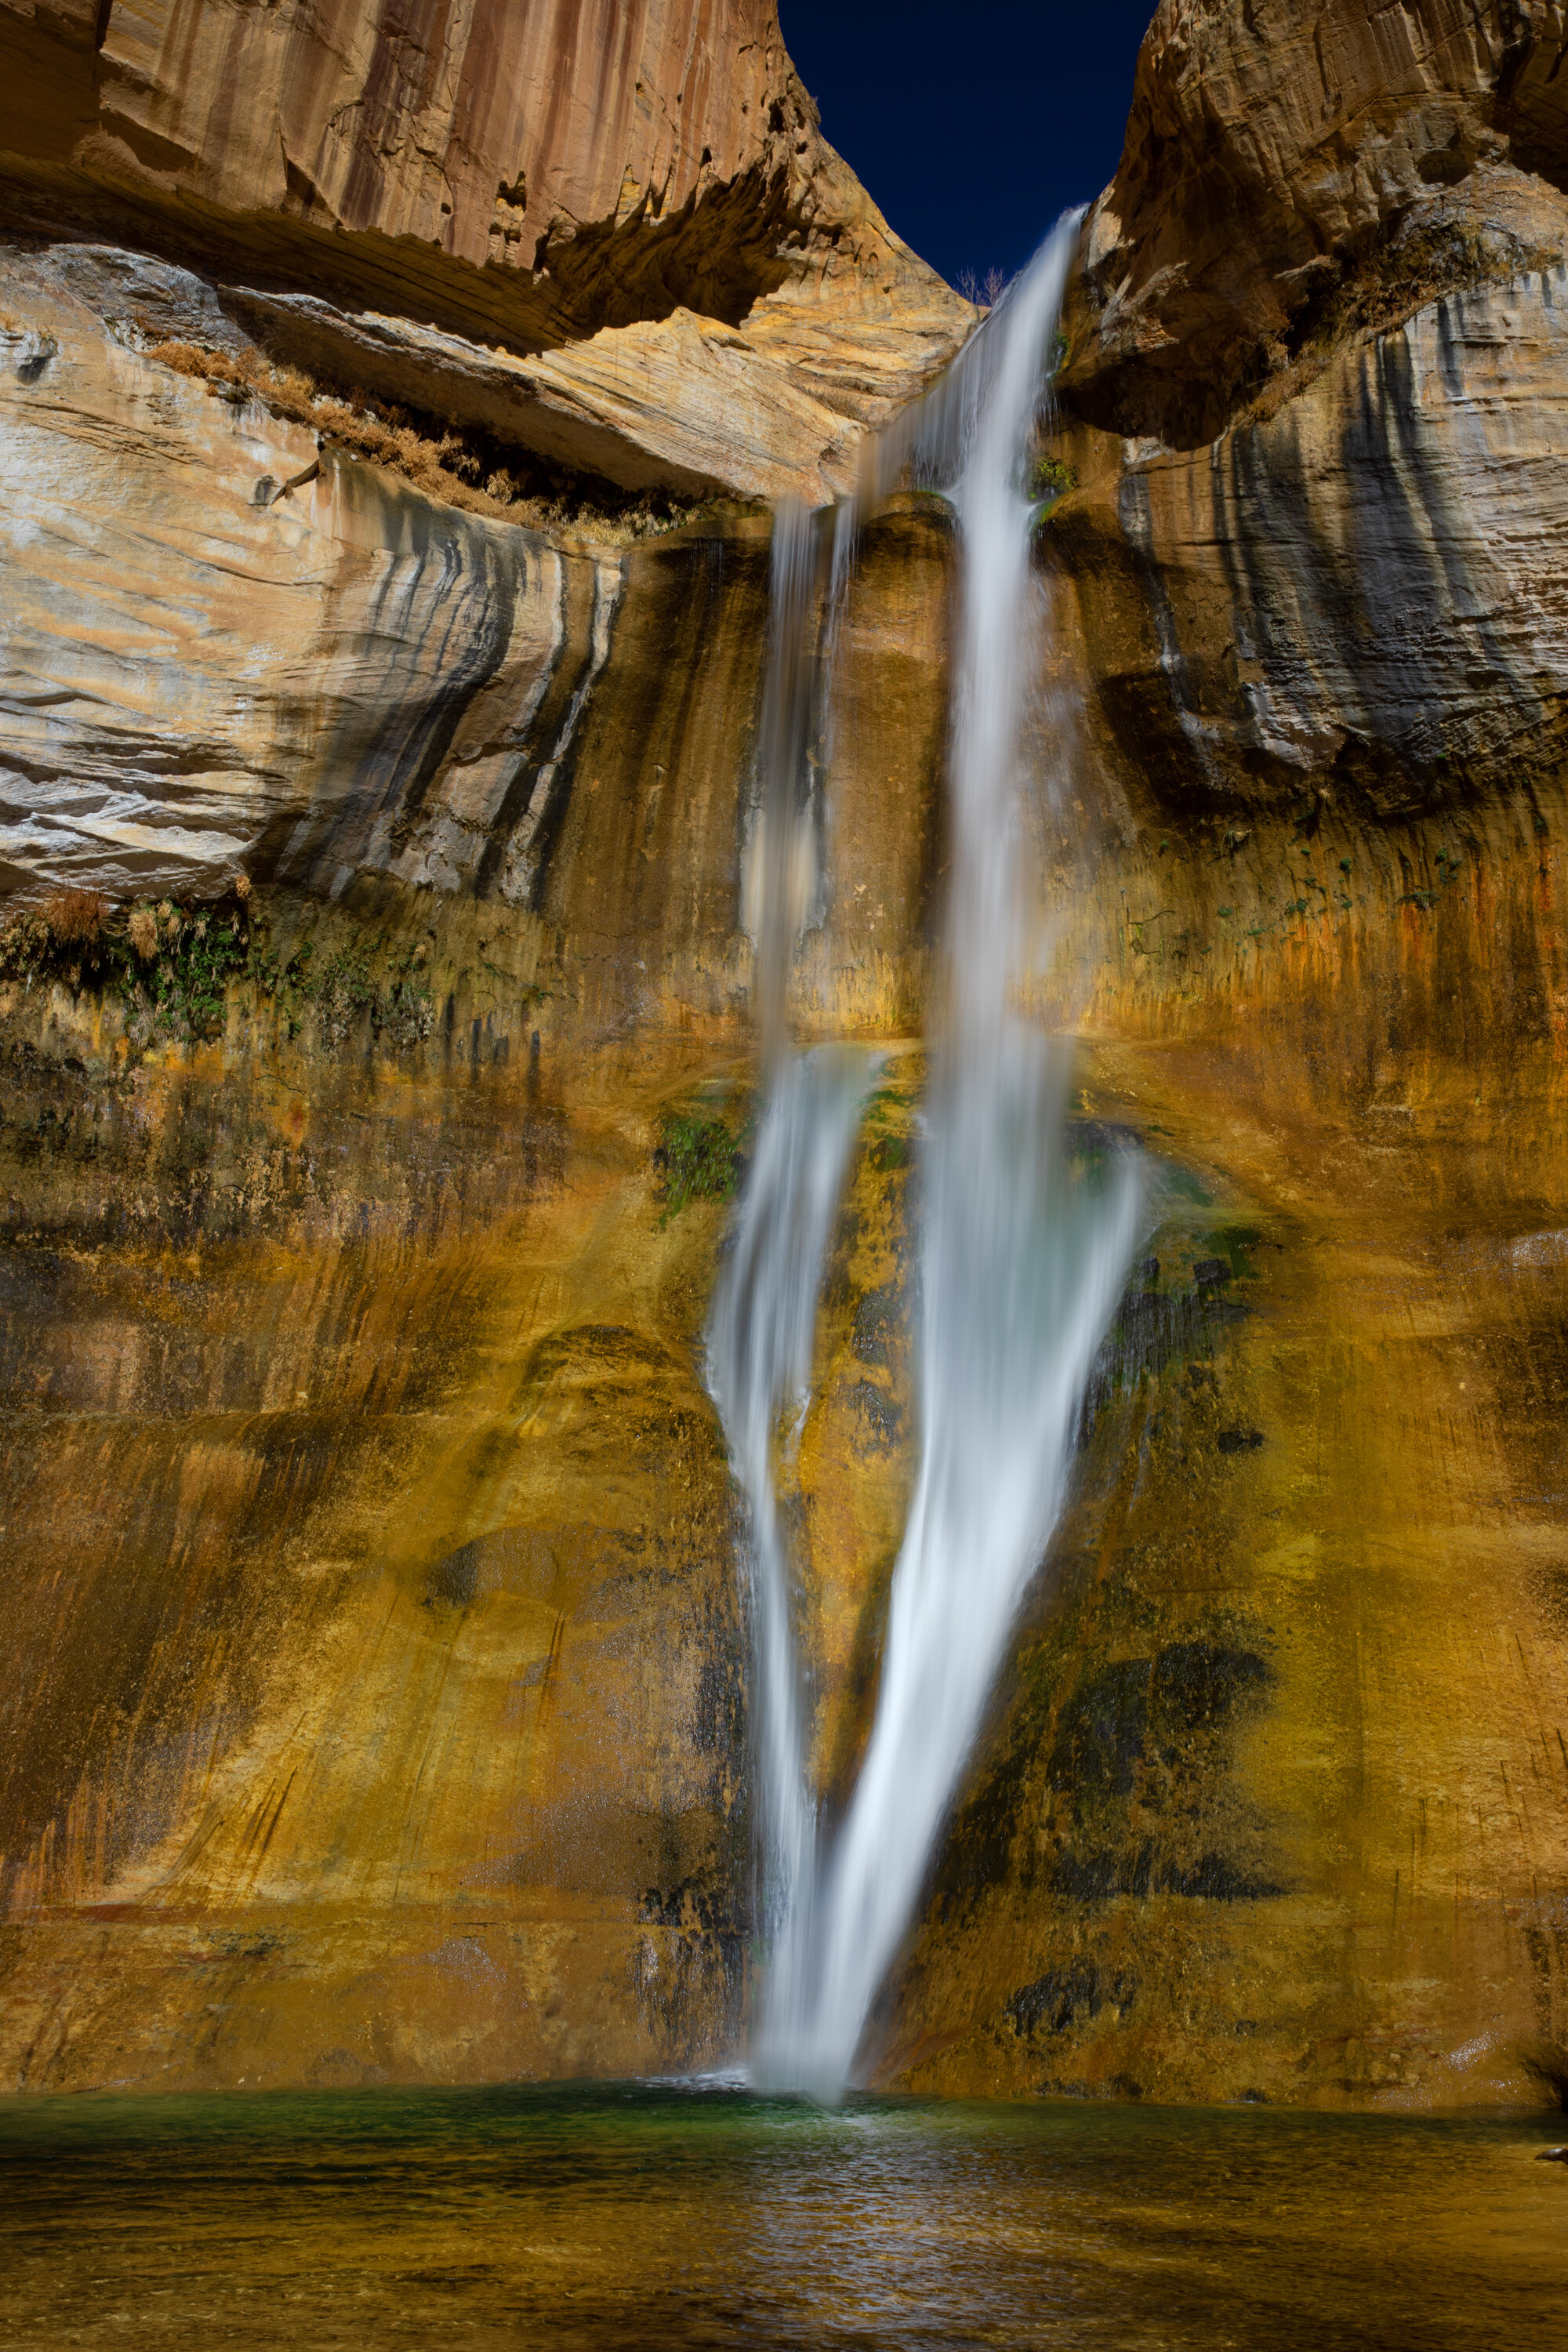
On a cold morning in September, I started out from Escalante, Utah to Lower Calf Creek Falls. I was dressed appropriately for the trip with several layers of clothing and of course, my camera bag and trusty tripod and not one but two bottles of water. The drive along Highway 12 was only 15 miles and by the time I approached the Calf Creek Campground the sky was filled with the slightest hint of dawn. The cool air was invigorating and the excitement of seeing the Falls filled me with excitement to begin the 7-mile round-trip hike to Lower Calf Creek Falls. Thinking back, perhaps I over dressed for the hike, but it felt good that I did not feel the chill as I set off to the North from the campground.
The trail was somewhat easy to transverse, but sandy patches along the way made for some difficult and narrow footing in some areas. The scenery was gorgeous as dawn lit up the canyon with magnificent colors. Mineral streaked cliffs of Navajo Sandstone stood guard over this area and I could only marvel at the pre-historic rock art and the many pictograph panels on display. I got lost in time thinking about what it was like in this area nearly 1,000 years ago. Stopping for rest at one of the beaver ponds along the way gave me a chance to catch my breath and finish half of my water supply. With renewed energy, I completed the rest of the hike tired but in awe of the beauty of Lower Calf Creek Falls, 130 feet high plunging playfully into an emerald green deep swimming hole. I immediately started to take photos of the falls from all angles, switching lenses constantly from a 24-70mm to 70-200mm lens and occasionally adding a polarizing filter to some of the photos.
As the morning progressed the temperatures started to rise and by late morning the temperature rose from near freezing in the early morning hours to nearly 60 degrees. By this time, I finished my water supply and was totally content with the photos I captured of Lower Calf Creek Falls. I also noticed that many other people were entering the grounds and a number of them were dressed in shorts and late-summer attire. About a half mile into my return trip to the campground, I started to feel the heat of the sun on my multi-layer covered body. Taking my coat off still meant I had to carry that along with my tripod and camera equipment and then as I reached for water, I realized I had none left. A mile later, I began to feel signs of dehydration and at the two-mile return mark I was not exactly sure I was going to make it back to the car…and I longed for nothing more than to have a few bottles of water and a pair of shorts on. At this point friends provided me with water and I consumed 4 bottles almost at one time. Also, they helped carry some of my gear. I eventually made it back to the car with my treasure of photo, but I did learn a lesson that day. Perhaps to check the weather for the entire day and dress accordingly with less layers and always to bring more water than one thinks they will need….no matter the extra weight.

Working With a New Model
If this is a new model’s first photoshoot, it is best to reduce any anxiety by touching base with the model before the photoshoot to talk about the type of photoshoot and what the model is expected to bring with her to the photoshoot. Have the model practice various poses in a full-length mirror before the studio shoot…


If this is a new model’s first photoshoot, it is best to reduce any anxiety by touching base with the model before the photoshoot to talk about the type of photoshoot and what the model is expected to bring with her to the photoshoot. Have the model practice various poses in a full-length mirror before the studio shoot. The photographer may also want to encourage the model to practice posing their lips and face. Remind the model that not every shot will be a smile, so practice everything in-between.
As a photographer, you will be providing direction for the model to follow, but the model should be free to offer ideas for a pose. Remember you are both working together to create amazing photographs. During the photoshoot, start simple. Basic standing and sitting photos will help set the stage to where the photographer can incorporate more creative shots showing more emotion and allowing the personality of the model to shine forward.
New models have a hard time knowing exactly what to do with their hands and arms….and at time legs. Encourage the model to keep their arms and legs somewhat angled. Think triangles. Also keeping one’s hands straightforward with no balled-up fists and fingers together will lead to more professional photos. A model may want to bring a hand up to rest on her head or the shoulder. This movement will definitely add a certain amount of intrigue to the photo. Most new models seem to feel they need to start with a squared-up straight on shot, which can become boring unless the photographer encourages a weight shift to one side to give the shoulders and head a moderately exaggerated tilt and a more interesting photo.
I like to have models lean on a wall or director’s chair. This adds a lot of drama to the photo, especially if the arms and legs have a slight bend to build in some type of shape. Add some movement and adjust the lighting to match the scene and the model will be pleased with the outcome.
A new model may ask about moving, if so, remind the model to be as fluid as possible as she moves around every few seconds to change things up. However, no matter if the model is moving her arms, legs body, head, always have her avoid drastic and sudden movements.
In addition, I also like to have my models sit on an object or use the floor at times. Always remind the model, when sitting, turn a bit to one side rather than face on to the camera. The shot will be more dramatic, especially if the model turns a bit toward the light source. The photographer may also want to have the model lean forward or back when sitting. The result of each creates a different photo, both of which can be very creative….and do not forget that classic looking back over the shoulder look. For the perfect way to end a photo shoot.
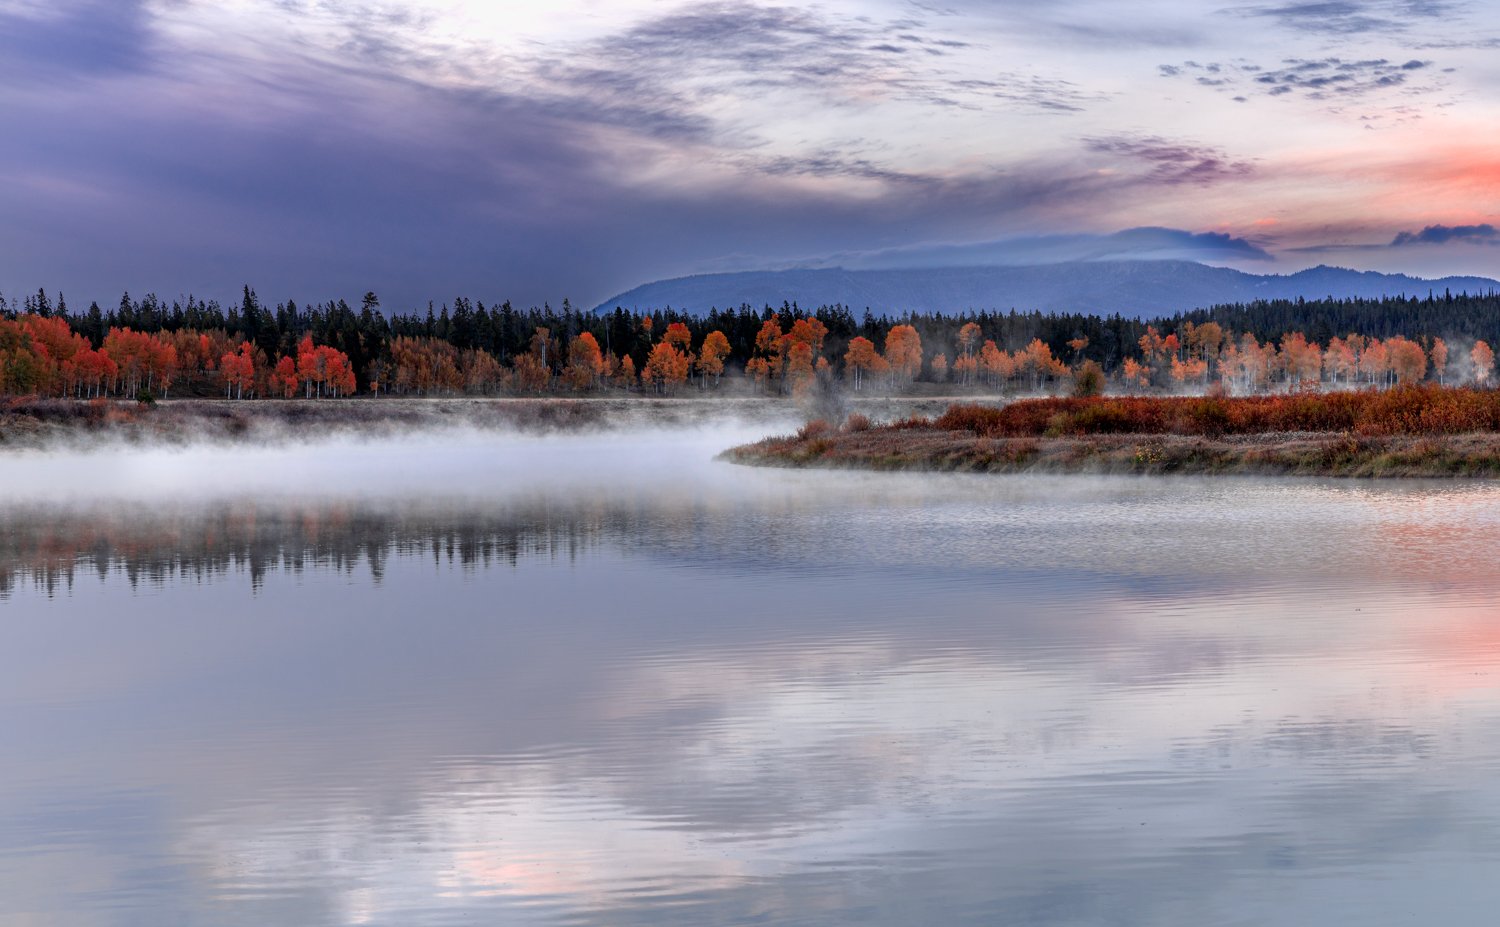
Mist Rising
On a cool October morning in 2021, I set out from my basecamp at predawn for a 45 minutes drive to Oxbow Bend, in Jackson Hole, Wyoming. The temperature was near freezing and the path down to the Snake River was treacherous in the dark. As soon as I arrived at the bank of the river…
One of my new Fine Art Photographs is entitled Mist Rising from Snake River.
On a cool October morning in 2021, I set out from my basecamp at predawn for a 45 minutes drive to Oxbow Bend, in Jackson Hole, Wyoming. The temperature was near freezing and the path down to the Snake River was treacherous in the dark. As soon as I arrived at the bank of the river, I was taken aback by the beauty of Mount Moran across the river to the west. During the "blue hour" I immediately started taking pictures of this majestic site from many angles. Time flew by. Then I looked around toward the east and it was then that I saw, as sunrise approached, the beautiful image of the rising mist from the calm silky waters reaching up to the beautiful colors of the tree-lined riverbank. It had a mysterious, yet ethereal feel that seemed almost magical.